FanOfTechnic
Top 1000 Contributor
Share FanOfTechnic's profile
FanOfTechnic's Stats
FanOfTechnic's Stats
- 4.7Average Rating
- 117Helpfulness Votes
- 0Featured Reviews
- 6Review Count
- August 12, 2013First Review
- September 10, 2015Last Review
FanOfTechnic's Reviews

Posted:September 10, 2015
FanOfTechnic
Age:
35-44
years old
Building Experience:
Intermediate LEGO builder
Overall:

4
/
5
Not as accurate as the product specification
" I just got this and I found that it doesn't live up to the specification. It seems like it can only work with 1 inch distance to 100 inch distances. It doesn't work with 1 cm distance as mentioned in the spec "Measures distances between one and 250 cm (one to 100 in.) ". Also, less than 1 cm actually reads back as 255 cm.
"
I would recommend this to a friend!
State:
California
From:
United States
Age:
35-44
years old
Building Experience:
Intermediate LEGO builder
Purchased For:
Self
I would recommend this to a friend!
Share:
+22points
41of 60found this review helpful.

Remote-Controlled VOLVO L350F Wheel Loader
Remote-Controlled VOLVO L350F Wheel Loader
Posted:August 23, 2015
FanOfTechnic
Age:
35-44
years old
Building Experience:
Intermediate LEGO builder
Overall:
4
/
5
Easy to make, fun to play with assembled loader
" I own the MK II crane and also the 8043 excavator. So, one of the first things I felt was comparing the build and play experience with those two. Here is what I realized. MK II is much more difficult to put together as a single motor controls everything. 8043 on the other hand has a lot of motors dedicated for each function and so the engineering effort to make it doesn't seem like as much complex as the MK II. But it makes it fun to use the remote control and perform all the functions.
This loader's build and play experience will be similar to 8043. But one key difference is that this is much larger and also heaver. Having done a bunch of V8 engines I am now almost bored of that being called out as a feature. But the rotating fan attached to the V8 engine makes it a little difference and interesting.
I liked the way the loader functionality is done using two motors both of which are in the front portion of the loader that rotates with the servo. Servo steering provides steering but the steering doesn't feel natural. You just have left/right turns at specific angles and that's it. There is no way to reduce or increase the turn angle.
The bucket is huge as others said and can carry a lot of things. I am wondering if the bottom of the bucket could be slightly less blunt (don't want it to be sharp as it can hurt kids) so it's easy to pick up things. In spite of operating the loader against a wall we found it hard to pick up things with the loader. The loader operation itself is smooth and perfect and so I am concluding that the bottom of the bucket makes it hard to pick up things.
After completing this project I appreciate MK II even more and so went and grabbed two more of those :).
At this stage my wish from LEGO would be a Technic set that is a combination of MK II for complexity and this loader for playfulness. May be that would be MK III where more functions and fewer motors but all remotely controlled.
"
I would recommend this to a friend!
State:
California
From:
United States
Age:
35-44
years old
Building Experience:
Intermediate LEGO builder
Purchased For:
Self
Build Time:
12
hrs
Play Experience (Optional):
5
/
5
Value for Money (Optional):
4
/
5
Level of Difficulty:
Average
Very Easy
Very Challenging
I would recommend this to a friend!
Share:
+1point
1of 1found this review helpful.

Twin-rotor Helicopter
Twin-rotor Helicopter
Posted:August 3, 2015
FanOfTechnic
Age:
35-44
years old
Building Experience:
Intermediate LEGO builder
Overall:
5
/
5
Good for special parts
" I wasn't really planning to get this set. I just happened to go to ToysRUS with my son and then decided to get something simple. I first considered a few other sets but in the end went with this one because I wanted a few parts in this set that my son could use in other projects. Like the blades and the bevel gears. In many of the advanced models I built, I am quite used to the bevel gears and the U-shaped part to put the gears at right-angles. Having two of those available in this set makes this set good for gathering such parts. Of course, it's fun for kids to rotate the knob at the back and see two blades rotating simultaneously.
Note: For a 6 to 8 yr old kid this set will be easy to average even though I gave "very easy" rating from my point of view.
"
I would recommend this to a friend!
From:
United States
Age:
35-44
years old
Building Experience:
Intermediate LEGO builder
Purchased For:
Son
Build Time:
40
mins
Level of Difficulty:
Very Easy
Very Easy
Very Challenging
I would recommend this to a friend!
Share:
+2points
2of 2found this review helpful.
Ferris Wheel
Ferris Wheel
Posted:July 21, 2015
Overall:
5
/
5
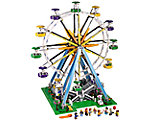
Gorgeous Play Set
" Even though this was advertized as 16+, I got this toy for my son's 6th birthday. We built this over the weekend most of the assembly done by me. The fun began for my son after that and I can see him enjoying moving the mini figures around and playing with it. Only 7 months back we went to Disneyland and so he is all too familiar with the concept.
What I liked about the set:
1) Very colorful
2) I am a technic fan and haven't invested much in creator. But this set contains some aspects of techniq like the break mechanism. Fans of both technic and creator are likely to like this set very much
3) The way the ferris wheel rotates is itself a cool idea. I have not seen before the idea of using rubberbands to delicately balance and apply right level of pressure on to the ferris wheel to make it rotate. Also, since the tires are much smaller compared to the ferris wheel, the gear reduction is natural.
4) In technic sets, usually making them power function enabled requires making a few alterations. However, doing the same for this set is very easy. No need to pull out lot of pins and parts. Just remove two pieces that are not tight anyway, and put the battery box and the motor. Takes no more than a couple of minutes to do this. And it's worth it to watch the wheel go around smoothly. Note that, once you put the power functions, the hand cranking mechanism becomes very stiff. So, either you can use power functions or remove and use manually. Wish there is a switch to easily toggle between the two so the manual operation is easy.
5) Everything about this set is as realistic as one can get in a 15"x24" set.
Cons:
1) When building the wheel, I felt that the parts are prone to come off easily. The wheel parts don't have enough reinforcement which is probably to keep it slender and not too heavy. But that also means it's hard to put them together, especially once both wheels are done and you are trying to combine them and hook it up to the supporting pillars.
2) The gondolas are nice and after building 2 of them, i could memorize making it easy to build the rest fast. However, the rectangular brick at the top below the top cover is not the right piece there. It makes it hard to put the mini figures inside those gondolas. Especially hard for smaller kids.
3) There should have been more mini figures. Common, have you ever seen Ferris wheel operating without full capacity? :).
I noticed in the reviews some people complaining that it's repetitive. But what do you expect? It's obvious that one has to make two large similar wheels and then 12 gondolas.
Here are a couple of things to watch out for
1) When building the wheels, 6 segments have to be attached. However, the instructions ask you to build 4 and then 2. The two have an extra part and they should be diagonal. So, don't put the 4 segments side-by-side ignoring what's in the diagram.
2) Build the set on a hard smooth surface and keep pressing the bricks gently to make sure the whole build is coming along nice. Same with wheels, once they are done and attached, just rotate and try to press the spokes to ensure the bricks are all tightly joined.
3) Make sure that net mechanism works fine as you go along and not wait till the end. As you build the assembly that allows raising the platform on both sides, it goes way inside and fixing any mistakes will be costly later on.
When I have more space it would be fun to use the Mobile Crane MK II and do a repair at the top of the wheel :).
"
I would recommend this to a friend!
From:
United States
Age:
35-44
years old
Purchased For:
Son
Build Time:
16
hrs
Play Experience (Optional):
5
/
5
Value for Money (Optional):
4
/
5
Level of Difficulty:
Challenging
Very Easy
Very Challenging
I would recommend this to a friend!
Share:
+4points
5of 6found this review helpful.

Mini Off-Roader
Mini Off-Roader
Posted:September 9, 2013
FanOfTechnic
Age:
35-44
years old
Customer Type:
LEGO Fan
Building Experience:
Intermediate LEGO builder
Overall:
5
/
5
Nice little vehicle
" Today I had the fun of building this with my son. He is much younger than the recommended age but we both like building it together.
This is the 3rd mini vehicles we own. The others are 8065 (mini container truck) and 9390 (mini tow truck). Unlike those sets where you play with rotating the black gear to activate functions, this one you just drop gently from a little height and see that it safely lands due to the spring action. The spring action is provided by rubber bands and not parts with real springs as can be seen in some of the larger technic sets. But this is meant for smaller kids and they will have fun bouncing the off-roader.
Next thing I like about this set is, unlike the other two models mentioned above, this reuses part of the build for model B. This should introduce the concept of designing modular components so that only some modules can be redesigned while others are reused. The bottom module is reused while the top module is rebuilt. These two modules are connected with a single axle which is brilliant (note, this is for small kids) helping them to start thinking along those lines.
Overall a cool set. Definitely for smaller kids. Or if you like collecting all the technic sets, then this wouldn't hurt. I am hoping to get the Unimong and/or 4x4 Crawler and if I do, I can show my son the more realistic behavior of those and compare how similar suspension effect is achieved using rubber bands in this simplified model.
One last word: I rated the build difficulty as "very easy" from my perspective. But from a 7 yr old which is the minimum recommended age, it would be challenging or very challenging. 10+yrs could find it easy.
"
I would recommend this to a friend!
From:
United States
Age:
35-44
years old
Customer Type:
LEGO Fan
Building Experience:
Intermediate LEGO builder
Play Experience (Optional):
5
/
5
Value for Money (Optional):
5
/
5
Level of Difficulty:
Very Easy
Very Easy
Very Challenging
I would recommend this to a friend!
Share:
+16points
18of 20found this review helpful.

Mobile Crane MK II
Mobile Crane MK II
Posted:August 12, 2013
FanOfTechnic
Age:
35-44
years old
Customer Type:
LEGO Fan
Building Experience:
Novice LEGO builder
Overall:
5
/
5
Wonderful design
" This is the 3rd technic set I build. Previous ones were 600 to 800 piece range. This is 3 to 4 times more and complexity is not linear. I may have taken a total of 24 - 30 hours spread over an entire weekend. I made a few mistakes that cost some time. When building the outriggers I used grey color beams instead of black. Realized it only when I needed an extra grey beam and then had to tear down the outriggers. That cost a few hours.
This is an amazing machine. Since a single motor controls 5 different functions, there are a lot of gears and axles sometimes making you wonder what are they all needed for. Since there are 10 wheels and 4 pairs actually turn, making them all align during build is not easy. However, there is a build technique to do this which I found interesting.
After building the superstructure and positioning it on the truck make sure to test out with battery to ensure noting went wrong. For me, the single axle that goes into the truck wasn't positioned properly but I pushed the blue pins on the sides and removing those to readjust proved to be difficult. I found that I could use a ball pen point and push the blue pins out by putting the tip into the small groves.
While it's amazing that 5 different functions are controlled by a single motor, that also means constantly changing the red buttons to activate different functions. Getting rid of this by adding additional motors may not be easy.
There are 6 books and first 3 are used for the truck, next 2 for the super structure and the last one for the crane arm. After building each of the 3 modules I was always left with some pieces. I wish there is a way to know what parts are spare to ensure no mistakes were made. Also, don't open all the parts, just open each of these 3 sets (marked as 1, 2 and 3) and build the modules and then assemble.
Makes me wonder if LEGO will out do itself with another crane in the next 10 yrs. The current one seems pretty awesome.
"
I would recommend this to a friend!
State:
California
From:
United States
Age:
35-44
years old
Customer Type:
LEGO Fan
Building Experience:
Novice LEGO builder
Play Experience (Optional):
5
/
5
Value for Money (Optional):
5
/
5
Level of Difficulty:
Very Challenging
Very Easy
Very Challenging
I would recommend this to a friend!
Share:
+40points
50of 60found this review helpful.