LeastValuableHorse
Share LeastValuableHorse's profile
LeastValuableHorse's Stats
LeastValuableHorse's Stats
- 2Average Rating
- 53Helpfulness Votes
- 0Featured Reviews
- 1Review Count
- June 26, 2020First Review
- June 26, 2020Last Review
LeastValuableHorse's Reviews

Posted:June 26, 2020
LeastValuableHorse
Age:
45-54
years old
Building Experience:
Expert LEGO builder
Overall:

2
/
5
Let's clear a few things up!
" OK fans, I am going to try to write a DETAILED review of this LEGO set and the pitfalls I experienced over my extensive build time. First off, I am not a novice. If fact, I would consider myself a Master Builder. I have 4 enclosed display cabinets in my house to showcase these projects. So believe me, when I say that this set was "challenging" it was (to say the least). So without further ado, let us begin...
1) I experienced no issues with color / discoloration. All parts in the lime green matched perfectly.
2) I also experienced no issues with missing parts.
3) I did, however, find at least 5 different incidents where the LEGO instructions are completely wrong. I will elaborate further on these next.
2) I also experienced no issues with missing parts.
3) I did, however, find at least 5 different incidents where the LEGO instructions are completely wrong. I will elaborate further on these next.
3A - The first building road block occurred at step # 367. In this detailed picture, the rear wing lift assembly is mated to the chassis using the 2 black connectors. However, in the previous steps, these connectors are not referenced so in step #367 (looking very closely) you must ADD these connectors.
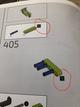
3B - Our next build challenge comes at step #405 (and not from Will Arnett). The instruction box calls for 1X of a green size 5 technic link. However, the assembled pic shows that the size "magically" increased to a size 15 link.
3C - Our next build hiccup comes at step #566. In this step you are building the left side roof brace. However, after completing the sub-assembly, the detailed diagram shows the part attaching to the right side of the car! Not only is this physically impossible, but this operation is completed in subsequent steps. OOOPS.
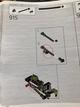
3D - OK, zipping along to step 915, the sub-assembly diagram show that the "Mickey Mouse" black connector is oriented onto the size 6 rod in the downward position. Yet, when the sub-assembly is married to the LH front head assembly, the connector is "magically" oriented upward!
3E - And lastly on step #921 where the second half of the LF headlight assembly is being build, step 4 in the sub assembly shows the X 0 connector in the wrong orientation. In step #4 you are inserting the white "lens" (bar) through this connector, yet if you look closely, the circle end of the connector is placed over the size 3 grey bar (causing the part to spin freely and not allowing the white bar to properly be inserted to the correct depth on the part as you are inserting it into the "X" end rather than the "O" end. Good grief! That took a while to find that problem out after the completed LF headlight assembly looked off.
Now the crazy thing about this build is that EVERY step that is repeated to the right side of the car was corrected labeled, drawn, and oriented. But the left side for each of these hiccups was completely amiss!
Now the final and most detrimental part of the build. I completed it 100% per the instructions and now the car will not roll. That's right kiddos!!! over 1080+ steps to find out the wheels are all locked. Once I placed all four rubber tire/wheel assemblies onto the car, she would not budge. I suspect there is a gear orientation issue somewhere with the transmission assembly. But you think I am going to tear the car completely down to diagnose it? Nope. So instead, the wheels on each axle spin in opposite directions perfectly. But trying to spin them in the same direction, you are distracted by the wonderful sound of plastic gear stripping plastic gear! Lovely!
So in summary, LEGO you need to invest more time in these instructions. With this many build errors and quality issues, you are REALLY trying to mimic a real Lamborghini vehicle. LOL.
Perhaps I can thrown my hat into the soup and become a "beta tester" for future builds. This review should be evidence enough of my attention to detail.
For the rest of the buying population, sadly I would have to recommend you pass up on this LEGO set. Probably the worst technic set put together and a giant step backwards from the Chiron and Porsches.
"
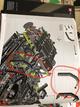
Images for this Review
(click to see full-size image)


I would recommend this to a friend!
From:
United States
State:
Michigan
Age:
45-54
years old
Building Experience:
Expert LEGO builder
Purchased For:
Self
Build Time:
12
days
Play Experience (Optional):
2
/
5
Value for Money (Optional):
2
/
5
Level of Difficulty:
Very Challenging
Very Easy
Very Challenging
I would recommend this to a friend!
Share:
+26points
53of 80found this review helpful.