Valerian70
Top 25 Contributor
Share Valerian70's profile
Valerian70's Stats
Valerian70's Stats
- 4.9Average Rating
- 1,397Helpfulness Votes
- 0Featured Reviews
- 146Review Count
- August 16, 2020First Review
- May 6, 2021Last Review
Posted:November 5, 2020
Valerian70
Age:
45-54
years old
Customer Type:
LEGO Fan
Building Experience:
Advanced LEGO builder
Overall:

5
/
5
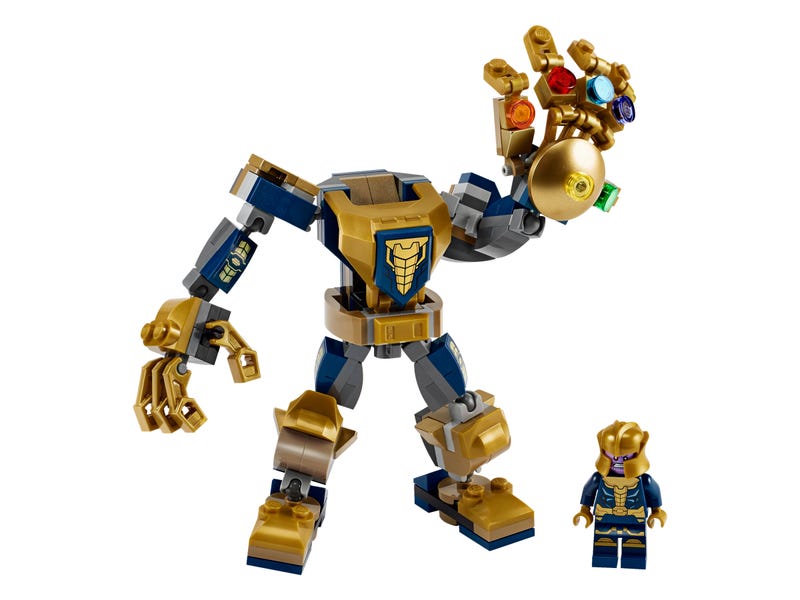
But Why?
" Let's address the elephant in the room - why, oh why, would Thanos need a Mech Suit? I still can't figure out why one is necessary but this build made me happy, it really does look great built and the build itself was fun. Yes, there is some repetitive build technique as the hands etc. are all fashioned in the same way. I think the colour for me was a big selling point, you don't see much in the gold tones so it does immediately attract you for that if nothing else.
For the price point the size is pretty good and certainly better value than I expected - from a play and display point of view. Even better the Thanos mini-figure is the business (and I'm nto even a mini fig collector!)
Number Of Pieces: 152
Approximate Price Per Piece: £0.06
Build Time: 30 Minutes
"
Images for this Review
(click to see full-size image)


I would recommend this to a friend!
From: Accrington
From:
United Kingdom
Age:
45-54
years old
Customer Type:
LEGO Fan
Building Experience:
Advanced LEGO builder
Purchased For:
Self
Build Time:
30
mins
Play Experience (Optional):
5
/
5
Value for Money (Optional):
5
/
5
Level of Difficulty:
Average
Very Easy
Very Challenging
I would recommend this to a friend!
Share:
+1point
1of 1found this review helpful.

Posted:October 29, 2020
Valerian70
Age:
45-54
years old
Customer Type:
LEGO Fan
Building Experience:
Advanced LEGO builder
Overall:
5
/
5
Nostalgic Plumbing
" This little beauty has been sat in my cupboard of joy for far too long and seeing as I had almost 2 weeks off work (11 days if we are being precise) I decided it was time he came out and got built. I fully expected to have to spread this over 2 days but got it done in one rather late night session. Admittedly I no longer part sort, I just tip each numbered bag in to a couple of plastic tubs for easy fishing through so that speeded things up immeasurably.
I had a few issues building the internal mechanism for the cartridge return. The spring is so strong when built it kept popping the bricks out of place so I had to do a bt of one handed building whilst I held it in place. Once the layer of securing bricks goes in place though it really does stay put. Even better when built it genuinely works and feels sturdy and certainly had no breakage issues with repeated use. The booklet does say the designers tested it thousands of times to make sure it woudl keep working and that certainly paid off.
For me the highlight of the build was making the scrolling screen. Then again the highlight of the modular building sets is always tiling the front of the street, so I'm weird. Took me maybe an hour to construct the screen but it was really good fun and I enjoyed watching it all come together. Even better because I have recently built the Crawler Crane the tracking was a familiar mechanism as it is the same as the one used for caterpiller tracks.
The only iffy bit for me was fitting the TV to the stand. If you don't have your grey straights in the correct place on the bottom of the TV there is nowehre to secure the stand to. I simply turned the TV upside down and lined them up that way, definitely works and at no time have I felt like the TV is going to fall off it's stand.
There are a couple of stickers included in the kit. Fortunately they are the large ones for the back of the TV and for the game cartridge. Everything else is preprinted. I dread to think how hard it would have been to get stickers on all the little bits and bobs on the TV screen.
Really interesting build with some new to me techniques and generally gives a great all over finish. Displayed it looks wonderful. Even better is when you put the Super Mario figure on the top and then run the scroll. No need to load the Super Mario App either which is a bonus.
Number Of Pieces: 2646
Approximate Price Per Piece: £0.08
Build Time:
Console - 3 Hours
TV - 3.5 Hours "
Console - 3 Hours
TV - 3.5 Hours "
Images for this Review
(click to see full-size image)


I would recommend this to a friend!
From: Accrington
From:
United Kingdom
Age:
45-54
years old
Customer Type:
LEGO Fan
Building Experience:
Advanced LEGO builder
Purchased For:
Self
Build Time:
06
hrs
Build Time:
30
mins
Play Experience (Optional):
5
/
5
Value for Money (Optional):
5
/
5
Level of Difficulty:
Average
Very Easy
Very Challenging
I would recommend this to a friend!
Share:
+4points
4of 4found this review helpful.

Posted:October 29, 2020
Valerian70
Age:
45-54
years old
Customer Type:
LEGO Fan
Building Experience:
Advanced LEGO builder
Overall:
5
/
5
Monster
" If we are being pedantic Frankenstein was the Doctor and the Monster he created never had a name...
This was a super quick build, even by Brick Headz standards. To be entirely honest, the finished look of the Monster is so good that the speedy build is not a problem, he is monochromatically majestic!
No little add on pieces to this figure, it is just the Brick Head with a plinth to display him on and that's all he does. Looks undeniably great next to the Haunted House and other seasonal Brick Headz on my shelf.
Number Of Pieces: 108
Approximate Price Per Piece: £0.09
Build Time: 15 Minutes
"
Images for this Review
(click to see full-size image)

I would recommend this to a friend!
From: Accrington
From:
United Kingdom
Age:
45-54
years old
Customer Type:
LEGO Fan
Building Experience:
Advanced LEGO builder
Purchased For:
Self
Build Time:
15
mins
Play Experience (Optional):
1
/
5
Value for Money (Optional):
5
/
5
Level of Difficulty:
Average
Very Easy
Very Challenging
I would recommend this to a friend!
Share:
+10points
10of 10found this review helpful.

Halloween Witch
Halloween Witch
Posted:October 29, 2020
Valerian70
Age:
45-54
years old
Customer Type:
LEGO Fan
Building Experience:
Advanced LEGO builder
Overall:
5
/
5
Hubble Bubble
" I got this figure to help round out my little Lego Hallowe'en display and I hadn't realised that it is a complete little scene in its own right. I really only saw the main Brick Headz figure and went "mine". The witch actually comes with a broomstick and cauldron as well as some other bits and pieces.
This is a fairly standard Brick Headz build so you start with building a rectangle that the features are then attached to. Such a simple idea but super effective. I really liked the blend of tiles used for the outer as they give depth as well as detailing. Not too sure about the Elphaba vibes she gives off with the green face but other than that super pleased with how it turned out.
Number Of Pieces: 151
Approximate Price Per Piece: £0.07
Build Time: 25 Minutes
"
Images for this Review
(click to see full-size image)


I would recommend this to a friend!
From: Accrington
From:
United Kingdom
Age:
45-54
years old
Customer Type:
LEGO Fan
Building Experience:
Advanced LEGO builder
Purchased For:
Self
Build Time:
25
mins
Play Experience (Optional):
3
/
5
Value for Money (Optional):
5
/
5
Level of Difficulty:
Average
Very Easy
Very Challenging
I would recommend this to a friend!
Share:
+2points
2of 2found this review helpful.

Halloween Ghost
Halloween Ghost
Posted:October 29, 2020
Valerian70
Age:
45-54
years old
Customer Type:
LEGO Fan
Building Experience:
Advanced LEGO builder
Overall:
5
/
5
Boo!
" I have recently become completely obsessed with the Brick Headz and seeing as I had the Haunted House to build I figured that was a good excuse to expand my meagre collection; cue Ghosty Poo being added.
As with all the Brick Headz there is something really thrilling about watching them come together from a rectangular blob to something instantly recognisable. I hadn't realised with this one that the Ghost itself sat in a little scene. Love the Jack-O-Lantern piece.
Quick and fun build. Certainly adds a little something to a Seasonal display.
Number Of Pieces: 136
Approximate Price Per Piece: £0.07
Build Time: 20 Minutes
"
Images for this Review
(click to see full-size image)


I would recommend this to a friend!
From: Accrington
From:
United Kingdom
Age:
45-54
years old
Customer Type:
LEGO Fan
Building Experience:
Advanced LEGO builder
Purchased For:
Self
Build Time:
20
mins
Play Experience (Optional):
1
/
5
Value for Money (Optional):
5
/
5
Level of Difficulty:
Average
Very Easy
Very Challenging
I would recommend this to a friend!
Share:
+2points
2of 2found this review helpful.
Posted:October 29, 2020
Valerian70
Age:
45-54
years old
Customer Type:
LEGO Fan
Building Experience:
Advanced LEGO builder
Overall:
5
/
5
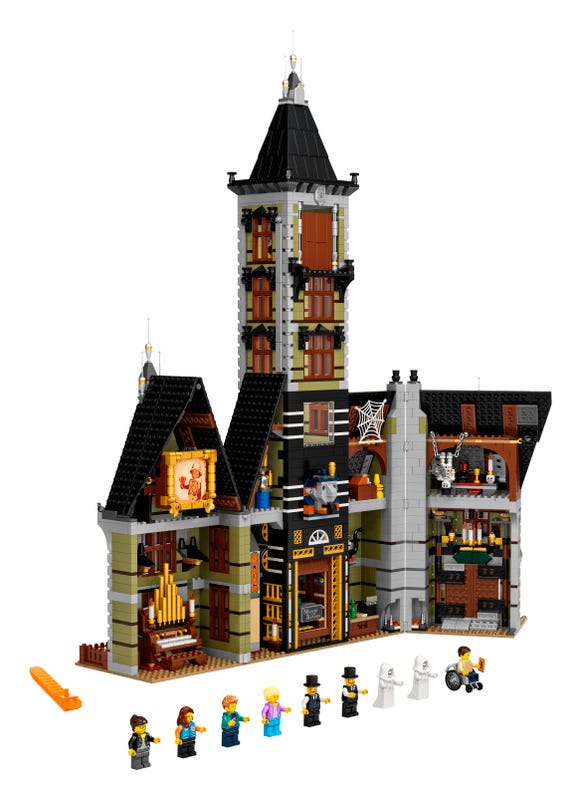
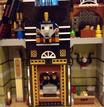
The Artifacts
" I was so excited to receive this kit but I knew that it would be a hefty build so I was saving it up for my planned time off work. Lets face it, 2020 is a bust holiday wise so how better to spend your time than building?
This build absolutely flew past. There is so much to see as you build and there are even little details in the build manual that explain what each artifact is that the Baron has on display. I loved all the throw backs to The Adventurers sets, I may have missed out on them but can dream of owning them I guess.
The use of the Light Brick is fun and I love the way it makes a "hidden image" appear in the portrait. Try it, it's fun! The main draw of this is the lift ride and it is the the last thing you build (more or less). Clicking the chain together was a breeze (easier than 203 of the blooming things for the Roller Coaster) and installation went well. However, the first time I used it I hadn't secured the carriage in to the lift properly (don't make my mistake make sure you clip it in to place) so it went up fine but on the drop the carriage jolted loose and jammed in the shaft. This also tore one of the grey breaking plates (thank you Lego for giving me 3 in my kit). So, I had to take the tower apart to free the elevator and then to rethread the chain. Now works smoothly but, to be honest, this is on display on a high shelf so I can't really play with it.
My favourite piece though is the organ. It just looks so cool built up and I can't believe how well it turned out - little mini masterpiece.
For those that care - NO STICKERS! Everything is pre-printed so no nasty fiddly bits that never end up looking right.
Number Of Pieces: 3231
Approximate Price Per Piece: £0.07
Build Time: 8.25 Hours
"
Images for this Review
(click to see full-size image)


I would recommend this to a friend!
From: Accrington
From:
United Kingdom
Age:
45-54
years old
Customer Type:
LEGO Fan
Building Experience:
Advanced LEGO builder
Purchased For:
Self
Build Time:
08
hrs
Build Time:
15
mins
Play Experience (Optional):
5
/
5
Value for Money (Optional):
5
/
5
Level of Difficulty:
Average
Very Easy
Very Challenging
I would recommend this to a friend!
Share:
+1point
2of 3found this review helpful.

Posted:October 29, 2020
Valerian70
Age:
45-54
years old
Customer Type:
LEGO Fan
Building Experience:
Intermediate LEGO builder
Overall:
5
/
5
Extinct
" Yes, I did it again, I bought multiples of a set so I could make all the builds and display them together. In the case of these the decision was made because the figures are the same creatures as the ones in the Dinosaur Fossils Ideas set. These are about 3/4 the size of the skeletons so I had to juggle my display a little bit but they certainly add to it.
All three builds come with their own instruction booklet in the box so nice and easy to work through at your own pace. Some different techniques used in each build but quite a few articulated pieces so there is definitely posing fun to be had with these guys. My favourite is the Pteranadon because of the posability.
Definitely a good set for young builders and it will introduce them to lots of new techniques. Heck, it introduced me to some new techniques and definitely opened some new possibilities up.
Number Of Pieces: 174
Approximate Price Per Piece: £0.08
Build Time:
Tyrannosaurus Rex - 25 Minutes
Pteranadon - 20 Minutes
Triceratops - 15 Minutes "
Tyrannosaurus Rex - 25 Minutes
Pteranadon - 20 Minutes
Triceratops - 15 Minutes "
Images for this Review
(click to see full-size image)


I would recommend this to a friend!
From: Accrington
From:
United Kingdom
Age:
45-54
years old
Customer Type:
LEGO Fan
Building Experience:
Intermediate LEGO builder
Purchased For:
Self
Play Experience (Optional):
5
/
5
Value for Money (Optional):
5
/
5
Level of Difficulty:
Average
Very Easy
Very Challenging
I would recommend this to a friend!
Share:
+4points
4of 4found this review helpful.

Posted:October 29, 2020
Valerian70
Age:
45-54
years old
Customer Type:
LEGO Fan
Building Experience:
Intermediate LEGO builder
Overall:
5
/
5
Rawr
" I have been eyeing this kit up for a month or so and decided the time was right to get it and build it. Definitely not one that would be hanging out in my stash for a while, in fact it probably only had to wait a fortnight until work pressures eased so I could build again.
First off, I expected these to be rigid models when completed but they are pretty well articulated which allows them to be posed a little bit on your display. Also the models look much better in person than they do on the pack art - always a bonus. My favourite is the Pteranadon although Lego Sapiens always gives me a chuckle.
You would think that a set like this would have no stickers. Well, you would be wrong. Sadly all the name plates are created via stickers which was a bit of a downer but I got over myself and attached them.
Surprisingly large when completed they are definitely a statement piece. I knwo that the images show dimensions but until you have them built you don't realise how impressive they look. Just keep them out of sunlight unless you want a weathered look to your bony builds.
Number Of Pieces: 910
Approximate Price Per Piece: £0.06
Build Time: 2.5 Hours
"
Images for this Review
(click to see full-size image)


I would recommend this to a friend!
From: Accrington
From:
United Kingdom
Age:
45-54
years old
Customer Type:
LEGO Fan
Building Experience:
Intermediate LEGO builder
Purchased For:
Self
Build Time:
02
hrs
Build Time:
30
mins
Play Experience (Optional):
3
/
5
Value for Money (Optional):
5
/
5
Level of Difficulty:
Average
Very Easy
Very Challenging
I would recommend this to a friend!
Share:
+24points
24of 24found this review helpful.

Posted:October 28, 2020
Valerian70
Age:
45-54
years old
Customer Type:
LEGO Fan
Building Experience:
Intermediate LEGO builder
Overall:
5
/
5
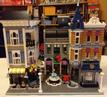
Destination Shopping
" It took me 3 days to build this over 2 weeks because real life and having to work kept getting in the way. Even when only part way through it looked great on the shelf and I made the decision that my in progress shelf was going to become a display shelf as I had to have this in my living room where I can gloat over it and I am still enjoying it.
Lots of fun build techniques here, especially for the ground floor shop signage. One downside is the use of garage doors for the patisserie shop windows, those things took me far longer to fit than they should have done and they aren't even fitted properly, just sort of propped in place and held in place by hope. On the up side NO STICKERS, any detailing is done by preprinted bricks.
The roof creation is awesome and the detailing looks incredible when finished, although why there is a chicken statue on the patisserie building roof I have no clue. One of my favourite bits of any modular build is the tiling on the base to create the external street and this is incredible on Assembly square. It does mean that you cannot really separate the buildings for individual placement though.
There are so many businesses tucked away in this build that I can't actually remember them all. My favourites are the ballet studio and the dentist's office
Just looking at it side on now and I realised the top level of my patisserie store isn't sitting right - might have something to do with a piece being missing from the kit but I cobbled something together. Think that is going to have to come off the shelf now so I can try and fix it.
Number Of Pieces: 4002
Approximate Price Per Piece: £0.05
Build Time: 11 Hours
"
Images for this Review
(click to see full-size image)


I would recommend this to a friend!
From: Accrington
From:
United Kingdom
Age:
45-54
years old
Customer Type:
LEGO Fan
Building Experience:
Intermediate LEGO builder
Purchased For:
Self
Build Time:
11
hrs
Play Experience (Optional):
5
/
5
Value for Money (Optional):
5
/
5
Level of Difficulty:
Average
Very Easy
Very Challenging
I would recommend this to a friend!
Share:
-1point
0of 1found this review helpful.

Posted:October 28, 2020
Valerian70
Age:
45-54
years old
Customer Type:
LEGO Fan
Building Experience:
Intermediate LEGO builder
Overall:
5
/
5
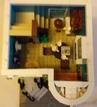
Novel
" I am a huge fan of the modular builds so it was a no brainer for me to get this one when I saw it. Especially as before I started being obsessed with Lego I was an avid reader - definitely past tense as I haven't picked a book up for about 3 months now which is so not me. Anyhow, on to the actual review.
There are lots and lots of little details within the buildings themselves and, for me, discovering those is what makes the build really exciting for me. I don't really research a kit before buying it or examine all the pack images omce it is in my sweaty little hands so builds like this with loads of little internal details make me "squee" whilst building. Definitely lots of that going on with this build.
First off the external looks of this set are excellent and I even like that pesky Birch Tree (although I would have liked a set of optional green "leaves" for it instead of it being permanentily autumn). Nice to have an actual residence next to the store instead of just retail outlets, depending on how you display your modulars you could separate them out as they just Technic pin together.
The internal stairs in the Bookshop are built, which I always enjoy. Yes, it is repetitive but something soothing about doing the same motions again and again to produce a finished look. They also look better finished than the premoulded ones.
Even better there are NO STICKERS! Where detailing is needed it is preprinted - heaven for my sausage fingers.
Number Of Pieces: 2504
Approximate Price Per Piece: £0.06
Build Time: 6.5 Hours
"
Images for this Review
(click to see full-size image)


I would recommend this to a friend!
From: Accrington
From:
United Kingdom
Age:
45-54
years old
Customer Type:
LEGO Fan
Building Experience:
Intermediate LEGO builder
Purchased For:
Self
Build Time:
06
hrs
Build Time:
30
mins
Play Experience (Optional):
5
/
5
Value for Money (Optional):
5
/
5
Level of Difficulty:
Average
Very Easy
Very Challenging
I would recommend this to a friend!
Share:
+53points
57of 61found this review helpful.