amazed78
Top 100 Contributor
Share amazed78's profile
amazed78's Stats
amazed78's Stats
- 4.7Average Rating
- 563Helpfulness Votes
- 0Featured Reviews
- 94Review Count
- February 18, 2015First Review
- December 25, 2018Last Review
Unikitty's Sweetest Friends EVER!
Unikitty's Sweetest Friends EVER!
Posted:December 25, 2018
amazed78
Age:
35-44
years old
Customer Type:
LEGO Fan
Building Experience:
Intermediate LEGO builder
Overall:

4
/
5
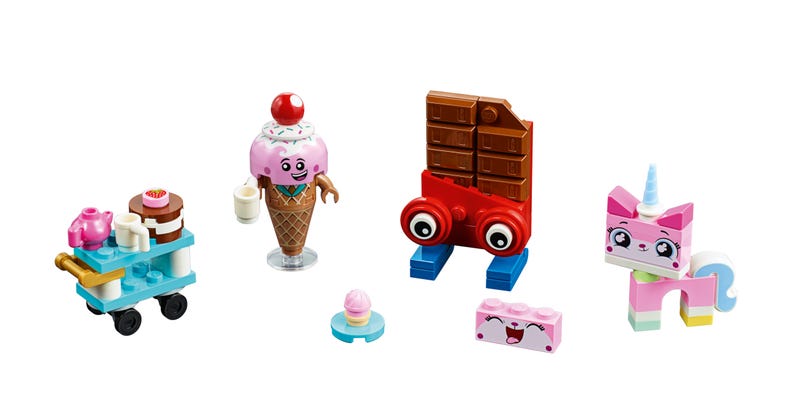
70822 Unikitty's Sweetest Friends EVER!
" With its 76 pieces, 70822 Unikitty's Sweetest Friends EVER! is currently the second smallest of THE LEGO® MOVIE 2 themed sets (I'm choosing to leave out the Duplo set 10895 which is smaller). THE LEGO® MOVIE 2 is scheduled to be released on February 8th 2019 in the US. When opening the small purpley-blue box with a few informative pictures of the set, I spy with my little eye two unnumbered bags (which means both of them need to be opened before assembling the set), and a 36-page instruction booklet folded in half. There are no stickers in this set, but right away I notice a whole lot of printed pieces which get my heart racing just a little faster. Yay!
The build begins with the assembly of Unikitty, literally a kitty with a unicorn's horn, who was one of the main characters in The Lego Movie (2014) and who has since become the star of her own TV series. The Unikitty in this set has a "traditional" color scheme (described here in layman's terms): two tones of pink, some white, a light blue horn, one foot and tail, and light green neck piece with a dash of light yellow on one foot. She consists of 14 pieces, but there also is an extra face with a different print included. One face is smiling benignly and the other looks as if in the throes of mirth, or possibly tasting something very good (her tongue is sticking out so it could be either). To use the alternative expression Unikitty needs some disassembling, but that is not such a big deal. Both of the faces are printed on one side, while Unikitty's curvy white tail is printed light blue on both of its flat sides.
Next build is a figure whose name is Ice Cream Cone, and who actually looks like an ice cream cone. He is standing on a transparent dish, holding a white mug/cup. The figure has medium nougat body and arms, his head is pink and there is (I presume) a dollop of white cream with sprinkles and a red cherry on top. Ice Cream Cone wears a white collared shirt and a golden tie, and his topcoat has azure lapels. He is assembled using just eight pieces (nine if one counts the mug), but a whopping five out of those eight pieces are new prints. I don't think I've come across the inverted 2x2x2 cone piece with a waffle print (element ID 6261728) ever before, even without a print, so it looks like this is a completely new part. I think the second completely new part is the pink dome (6261716), which is Ice Cream Cone's head and has a footprint of 3x3 studs. The medium nougat arms (element ID 6259768) are a recolor. Ice Cream Cone is surprisingly sturdy on his "feet" but is rather top-heavy. Most of the upward arm movement of the character is restricted by the size of his head.
Then the build proceeds to a 3-piece accessory: a cupcake on a plate. The plate is medium azure, the bottom of the cupcake is brick yellow, and a pink swirly piece rests on top. After that a tea trolley gets built. On the top tray is a second white mug, a bright purple (dark pink) teapot, and a brown and a white cake with a strawberry on top. The whole thing consists of 18 pieces, and is mainly medium azure and white with a golden handle and working black wheels. The cupcake on a plate is too high to fit on the lower tray of the trolley. There is no room for the second mug on top, but if the trolley is disassembled, the second mug can be sandwiched between its trays. I also noticed that the trolley does wheelies very easily and that nobody in the set actually has suitable hands for pushing it, not even Ice Cream Cone as his hands are one piece and thus the fingers can't be turned sideways to clasp the trolley's handle.
The last build is my personal favorite: a 31-piece figure aptly named Chocolate Bar. The chocolatey bits of this character are reddish brown, the wrapping is red, the black and white eyes are printed, and the figure stands on hinged blue legs. The reddish brown ingot pieces (6261744) that are used to create the appearance of a real bar of chocolate are a recolor. The weight distribution of Chocolate Bar doesn't allow much leg movement, or the figure will fall onto its back in a flash. After finishing the rather easy build, I noticed my set had 12 spare pieces, including a printed eye (6029156), a printed strawberry tile (6055381), and a cupcake top (6060795) so one can make an extra cupcake just in case they run out.
70822 Unikitty's Sweetest Friends EVER! is a small but fun set, with two highly detailed, cleverly constructed and funny new figures. It will be interesting to see what role these new friends will play in The Lego Movie 2. In my opinion, the number of new parts, prints and recolors in a set this small is astonishing. I would recommend this set to those who like Unikitty and/or ice cream and chocolate, and want to build something whimsical for a change.
"
I would recommend this to a friend!
From:
Finland
Age:
35-44
years old
Customer Type:
LEGO Fan
Building Experience:
Intermediate LEGO builder
Play Experience (Optional):
4
/
5
Value for Money (Optional):
5
/
5
Level of Difficulty:
Easy
Very Easy
Very Challenging
I would recommend this to a friend!
Share:
-1point
13of 27found this review helpful.
Benny's Space Squad
Benny's Space Squad
Posted:December 24, 2018
amazed78
Age:
35-44
years old
Customer Type:
LEGO Fan
Building Experience:
Intermediate LEGO builder
Overall:
5
/
5
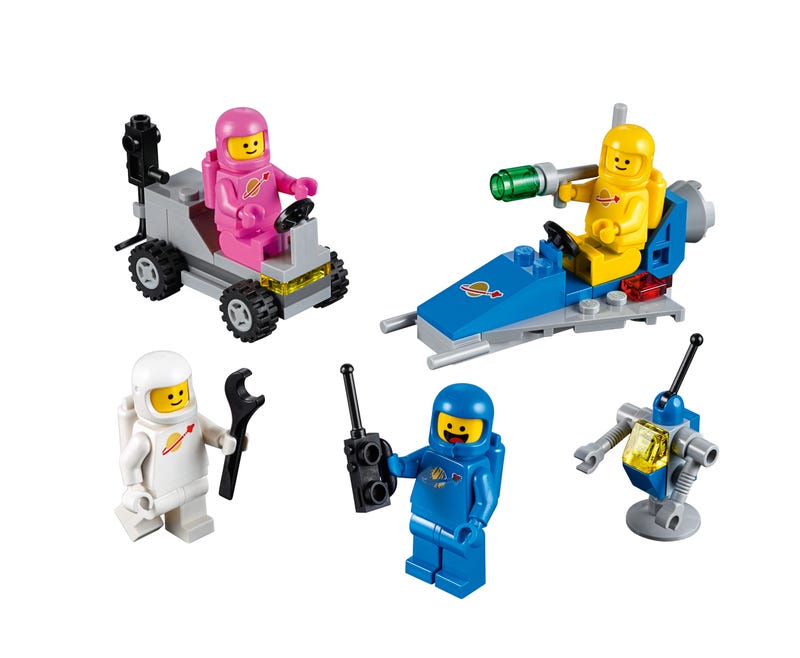
70841 Benny's Space Squad
" 70841 Benny's Space Squad is currently the smallest (or second smallest, if you count the 53-piece Duplo set 10895) of THE LEGO® MOVIE 2 themed sets. It has 68 pieces, which can be used to build four astronaut minifigures, what I presume is a robot or droid of some sorts, and two space vehicles. Opening the mainly purpley-blue box leaves me with two unnumbered bags and a 32-page instruction booklet folded in half, which makes handling it slightly awkward. There are no stickers in this set. Hooray!
The build is very easy, for me the most difficult part of this build was either trying to straighten the instruction booklet or getting the astronauts to stay in an upright position. First to be built is a blue astronaut, Benny, with a one-piece black walkie-talkie. Benny is the only minifigure to have a "broken" chin strap of his helmet, worn out printing on his torso and a reversible head. He has both a very widely grinning and a very scared expression printed on his head.
Next in line is a pink (officially bright purple) astronaut with a black wrench, Lenny. There is a gold and red print (a planet with an orbiting space ship) on front of Lenny's torso. The same print is used for three of the astronaut figures, and it looks like the print is a reproduction of the original emblem from space themed Lego sets which apparently date back to 1979. Lenny, like all of the astronauts in this set, has no visor, but there are two dimples at both sides of each of the helmets. After rummaging through my spare parts bin (and spilling some small pieces on the floor) I found one very old visor and am glad to report it was a match to the space helmets in this set, so if one wishes, the helmets can be equipped with visors.
Then we move on to a white astronaut, with a gray and green space gun, Jenny. Her gun is just two pieces, a gray space gun body (element ID 4595836) with a handle and a transparent green 1x1 round brick, but its weight can easily topple the figure.
Fourth build is a yellow astronaut with a black metal detector, Kenny. The metal detector is a single piece and can be used as additional support for Kenny so that he will stay upright. Lenny, Jenny and Kenny all have heads printed with the classic smiley face and no alternative expressions, which is the only thing I personally would change in this set. I would have been very happy indeed if all of the minifigures had had dual sided heads. All of the minifigure astronauts are also wearing (naturally color-coordinated) air tanks in order to breathe in space.
After the minifigures it is time to build the vehicles and suchlike. Fifth build is the robot/droid which consists of 8 pieces. It is gray and blue with two arms and an antenna on top, but no legs so perhaps it is a stationary robot or a hover-droid. Next item to be built is the 22-piece lunar buggy. It is gray with 4 black wheels, plus one for steering, and a transparent yellow plate for the headlights. The buggy seats two minifigures and has clips at the back where one can attach the accessories of the astronauts. Seventh and final build is the small spaceship. It has 13 pieces and its color scheme is blue and gray. The most interesting piece of the spaceship, in my opinion, is a blue 2x4 slope printed with the above-mentioned gold and red space emblem. There is also a steering wheel, a gray antenna attached to the side and a gray thruster at the back, while red tiles are used as tail lights. After finishing the build I noticed my set had 6 extra parts in it, including one spare antenna for the robot.
I think this set is just fantastic, four minifigures with accessories, a robot/droid and two small vehicles do offer a fair amount of play value. However, I suspect most of this set's value comes from the fact it also evokes a wave of nostalgia in me: when I was a child my cousins had a plethora of space-themed Lego sets (what I had, and admittedly preferred, was Town sets and sets with horses in them). I would highly recommend this set to all Lego space fans regardless of their age, and those who are looking for a trip down the memory lane. Oh yes, and of course for those who just want that pink astronaut, pink astronaut, PINK ASTRONAUT!
"
I would recommend this to a friend!
From:
Finland
Age:
35-44
years old
Customer Type:
LEGO Fan
Building Experience:
Intermediate LEGO builder
Play Experience (Optional):
5
/
5
Value for Money (Optional):
5
/
5
Level of Difficulty:
Very Easy
Very Easy
Very Challenging
I would recommend this to a friend!
Share:
+12points
21of 30found this review helpful.
Emmet's Thricycle!
Emmet's Thricycle!
Posted:December 24, 2018
amazed78
Age:
35-44
years old
Customer Type:
LEGO Fan
Building Experience:
Intermediate LEGO builder
Overall:
4
/
5
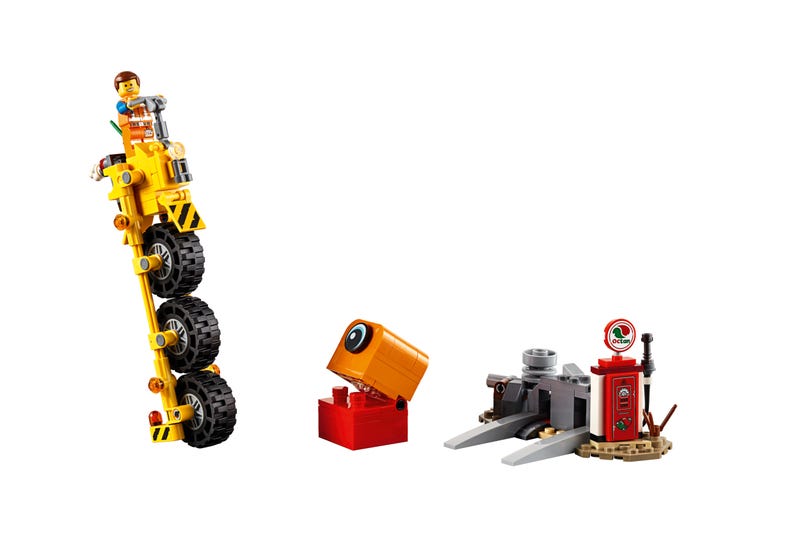
70823 Emmet's Thricycle!
" 70823 Emmet's Thricycle! is a set of 174 pieces. The set is based on THE LEGO® MOVIE 2 which is scheduled to be released on February 8th 2019 in the US. Cracking open the push tabs of the mainly purpley-blue box (with loads of colorful images of the set) reveals two numbered bags, a 84-page instruction booklet, and a sticker sheet for 8 stickers. The pieces can be used to build one minifigure, a plant, a fuel station with a catapult, and a docking station for the set's main attraction, thricycle: a strange looking vehicle with three vertically stacked tires.
The build begins with the contents of bag 1. First to be assembled is the minifigure, who is one of the main characters of the movie, Emmett. He is wearing an orange construction worker's attire with blue sleeves. The reflecting strips on his work clothes have been worn out but the name tag on his right leg is still legible. Emmet's hair is reddish brown with one lock sticking out a bit, and his head has two expressions printed on it (a smiling one and a scared one). Second build is a 41-piece red and orange alien invader which looks as if made from Duplo bricks. Its hinged mouth doesn't close all the way, which is not entirely to my liking. There is a friction pin inside the hinge so that the alien's mouth will stay in a fixed position, but the alien will tip over if its mouth is opened too wide. There is a new printed 2x2 round tile (element ID 6250671) which represents the alien's single eye. The eye can be rotated via a mechanism at the back of the alien's "head".
Next in line is the predominantly gray "parking spot" which offers extra support for the top-heavy thricycle. Then the red, white and gray an Octan fuel station gets built. Two of the stickers are applied at this point. I noticed the round sticker is a little tricky, I applied it only after fixing the sign on top of the pump, which, thanks to the stickers, looks old and a little rusted. The rather short fuel hose is a black whip piece. The pump is fastened to the parking spot via a clip and its angle of attachment can be adjusted up to a point. Next build is the mainly gray catapult, which also connects to the central parking spot by a clip. It catapults a large wheel rim (element ID 4299119) of which there are three more in the thricycle. I had some trouble getting the catapult to work but eventually I was able to catapult the living daylights out of the wheel rim. There are a total of 33 steps for this entire section of the build. My set came with 10 extra parts, including one whip (element ID 6092878) and reddish brown flower stem (6223678).
Bag #2 contains the parts for the thricycle, which has a yellow frame, black tires, while its rims and assorted bits such as the steering column are mostly gray. Six of the eight stickers in this set are used at this stage. The steering column is hinged and flexible, a bit like in stand up jet skis. Emmet's companion Planty and its pot are the last to be built. There were 8 extra pieces in this bag, including an extra Planty (6135278). I thought the exhaust smoke and mudflaps were hilarious. Emmet steers the thricycle standing up and Planty rides at the back. The fit is rather tight and Planty has to be positioned carefully in order not to poke Emmet while he is driving. I was quite disappointed by the wheels because they are not smooth and solid from both sides, instead one side of the wheel is open so the inner structure is visible. The thricycle can stand on its own leaning back a little (this is what the foldout stabilizers are used for), but it falls over easily which is not exactly a surprise as the vehicle is rather top-heavy. Docking to the parking spot works quite smoothly, unless the foldout stabilizers are angled wrong or pointed the wrong way. For some reason, I couldn't find a good place to grip the thricycle and if I tried to place my fingers anywhere else but the cockpit area the wheels tended to stop working properly.
The build is easy. As per usual, I struggled a bit with the technic bits and bobs and sweated over the stickers. I also managed to make a couple of mistakes after misidentifying some of the dark gray slopes used in the parking spot, but I did not break anything off or harm any outsiders while building, which has to count for something. All in all, I think this is a great little set with some cool play features. The thricycle is outrageously proportioned and just hilarious, the stickers for the fuel station are marvelous, and the Duplo alien invader is rather adorable instead of terrifying. It will be interesting to see if the thricycle makes an appearance in The Lego Movie 2 and if it does, for how long will it be seen on-screen.
"
I would recommend this to a friend!
From:
Finland
Age:
35-44
years old
Customer Type:
LEGO Fan
Building Experience:
Intermediate LEGO builder
Play Experience (Optional):
4
/
5
Value for Money (Optional):
5
/
5
Level of Difficulty:
Easy
Very Easy
Very Challenging
I would recommend this to a friend!
Share:
-3points
14of 31found this review helpful.
Pop-Up Book
Pop-Up Book
Posted:November 30, 2018
amazed78
Age:
35-44
years old
Customer Type:
LEGO Fan
Building Experience:
Intermediate LEGO builder
Overall:
5
/
5
21315 Pop-Up Book
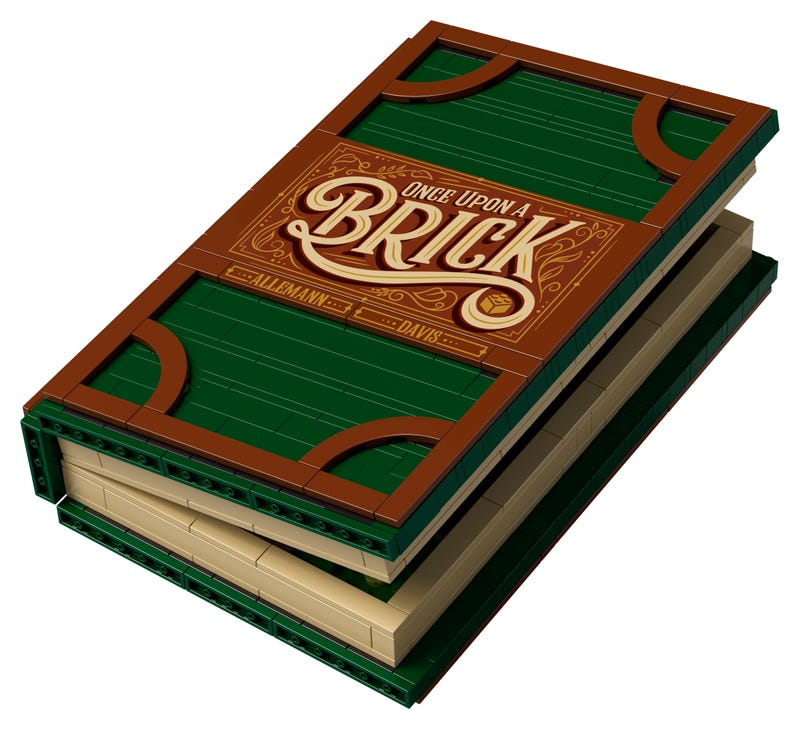
" 21315 Pop-Up Book is the 23rd Lego Ideas set, which means the original design was done by one or more Lego fans, and received 10,000 votes on the Lego Ideas webpage before being approved for production. The set has 859 pieces, which makes it the 5th largest Ideas set thus far. The set comes in a pretty box printed with dark brown bricks (the stone version, not plastic ones) and reddish brown wood. The front shows a closed Pop-Up Book on a wooden desk accompanied by an unlit candle, some papers, an inkwell, and very old eye glasses, and there are two small images of the book's interior printed on the corner. The back of the box shows the scene changing function and what's going on inside the book in more detail. Cracking open the push tabs that seal the box reveals 6 bags and two 8x16 plates loose inside the box, along with the instruction manual. The manual is 152 pages long, and there are 225 numbered steps pictured in it. The instruction manual is not in a separate plastic bag, probably because there are no stickers in this set. My manual was slightly bent. All of the bags are numbered (from 1 to 6).
The manual starts with an introduction of the two fan designers (Jason Allemann and Grant Davis), then does the same for the Lego designers. After that there is a short history of pop-up books in general, followed by a little background and introduction of both stories featured in this set, i.e. Little Red Riding Hood and Jack and the Beanstalk. The actual build starts at page 10 with the bricks from bag #1, which contains earth green and black pieces and builds the lower part of the book. Bag #2 has even more earth green and black pieces, plus a surprise of two reddish brown ones. These are the pieces for the upper half of the book. At this stage, the build has been very repetitive, which does not come as a surprise. Bag #3 reveals the first minifigures: Grandmother and the Wolf. At this stage the bricks are used to build the "pages" of the book, the corner landscape bits, the reddish brown ornaments for the cover, back and spine of the book, and grandmother's bed, plus a table with a teapot and a mug. Another minifigure lurks in bag #4, Little Red Riding Hood. The bag also contains the pieces for Grandmother's cottage facade and its folding mechanism. The final minifigure of this set is in bag 5, which has the pieces to build the Giant, a microfigure Jack, and the larger foldable bits of the landscape for Jack and the Beanstalk story. Bag #6 is the last bag of the set and builds the separate, smaller piece of landscape below the beanstalk, the stalk itself, the giant's castle, and some gray bits that anchor the string which pulls up the stalk. My set had 30 extra pieces in it, including a spare microfigure Jack.
The build is not very difficult, in my opinion, and I made only a couple of small mistakes when assembling the set. The most difficult part for me, personally, was the technic bits (again). I also noticed that one needs to have correct lighting when building the set, otherwise it is rather easy to mix up the earth green and black bricks, either when looking at the instructions or when building with the actual bricks (or both at the same time).
When playing with the set, I found the folding mechanisms for both stories to work perfectly. At one point, the book did not close properly when the Little Red Riding Hood scene was inside it, but this was because Grandmother's bed was ever so slightly off-kilter. It must be pressed against the fake pages quite tightly. I found the beanstalk function absolutely exhilarating and could not believe my eyes when the contraption actually fitted inside the book without a hitch. The cottage facade is very pretty and ornamental (which must have been difficult to accomplish with a limited number of pieces and space available), and the (working!) microscale windmill and houses are adorable. When the Little Red Riding Hood scene is inside the book, all of the four minifigures actually fit in when the book is closed, but only just. The fit is better if Little Red Riding Hood is parted from her basket. There is enough space at the foot and head of the bed for three of the figures and one figure just about fits between the corner landscape bits. The set pieces for the Jack and the Beanstalk story take less space and all figures fit inside comfortably.
I do have a few very minor gripes: When carrying her basket Little Red Riding Hood topples over easily and the pastries in the basket get thrown around. A limited number of exposed studs on the earth green surface means the minifigues rarely stay upright, but the lack of studs is in this case very understandable and would limit, or perhaps prohibit, the folding function. There is no space left to store the other scene, but to include such a space would mean a lot more bricks and a substantial price hike. I think a print for the spine would have made the exterior perfect.
There is an abundance of new printed pieces and recolors in Pop-Up Book: earth green 1x12 brick (element ID 6252592), earth green brick 1x1x1 2/3 with 2 vertical knobs (element ID 6252591), earth green hinge 1x2 lower part (6252589), earth green hinge 1x2 upper part (6252590), reddish brown flat tile 8x16 (6250298), dark brown wooden door (6254792), all of the reddish brown printed tiles (1x6 'Allemann' 6254441, 1x6 'Davies' 6254450, 8x16 6254400). All minifigure torsos (6254512, 6254507, 6254491, 6254516), both Grandmother's (6254948) and Wolf's legs (6254523), Wolf's head (6251969), Little Red Riding Hood's skirt (6252836) and hood (6251995), and microfigure Jack (6251962). If I have my facts straight, these all are bricks and pieces that are currently available only in this set, but I hope they will be used again in future sets.
In my opinion, after numerous robots, spaceships, buildings and vehicles, the Pop-Up Book feels very fresh, just what the Ideas platform is all about. As I am not the most imaginative builder in the world, I hope the future will will bring a set of additional scenes and stories for the Pop-Up Book. I would recommend this set for those who like books, pop-up mechanisms, fairy tales, earth green bricks, or the ones looking for something different to build.
"
I would recommend this to a friend!
My Product Recommendations
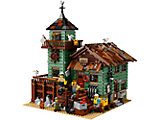
Old Fishing Store
 (121)
(121)
From:
Finland
Age:
35-44
years old
Customer Type:
LEGO Fan
Building Experience:
Intermediate LEGO builder
Play Experience (Optional):
5
/
5
Value for Money (Optional):
4
/
5
Level of Difficulty:
Easy
Very Easy
Very Challenging
I would recommend this to a friend!
Share:
+3points
6of 9found this review helpful.
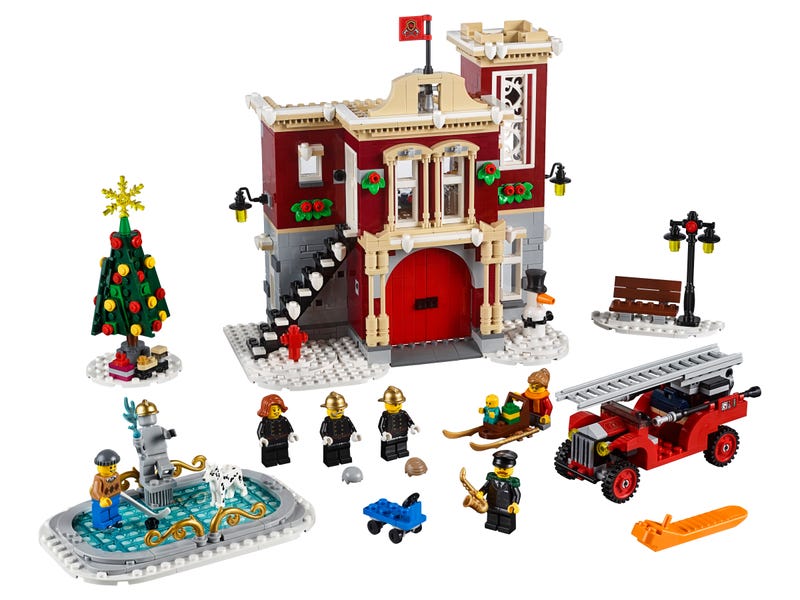
Winter Village Fire Station
Winter Village Fire Station
Posted:October 31, 2018
amazed78
Age:
35-44
years old
Customer Type:
LEGO Fan
Building Experience:
Intermediate LEGO builder
Overall:
4
/
5
10263 Winter Village Fire Station
" 10263 Winter Village Fire Station has 1166 pieces, which makes it the third largest holiday themed Creator Expert set to date, pushing last year's Winter Village Station to fourth place. Cracking the push tabs of the mainly wintry blue box reveals 10 bags of bricks (numbered from 1 to 3), and two instruction booklets along with a sticker sheet for 10 stickers inside a protective bag of their own. The first booklet is not only smaller in dimension but just 52 pages long and concentrates on building everything else but the fire station, while the second, larger one has 84 pages and contains the instructions for the whole station.
There are six minifigures (seven if one counts the statue, eight if one counts the baby), a red fire truck with a rotating and extendable ladder, a skating rink decorated with a water-spilling firefighter statue, a Christmas tree with a few gifts, a gold and brown sled, and a brown bench flanked by a black lamppost in this set, but the main attraction is a two-story fire station with big red doors and a flat-roofed tower. The ground floor of the station is mainly gray and dark red, while the predominant color for the upper floor is dark red with white window and door frames and some brick yellow columns. The detachable roof is brick yellow, but some snow has accumulated on top of it and the black stairs leading to the upper floor. There is a kitchen and a sleeping area with a fold-down bed upstairs, but all the firefighting equipment is stored downstairs along with the fire truck. If in a hurry, the firefighters can use a fireman's pole to slide down from the upper floor.
As far as minifigures go, Winter Village Fire Station contains three firefighters, all clad in dapper black gold-buttoned uniforms, an ice hockey player wearing a brown argyle sweater and blue trousers, a mustached musician in a black suit and green epaulettes with a saxophone, and a bespectacled girl in a red plaid shirt and gray trousers with an orange scarf. There is also a baby figure clad in a bright bluegreen onesie with a moose print, a gray statue wearing a golden firefighter's helmet, a white dog with black spots (a Dalmatian but with pointy upright ears), and a brick-built snowman sporting a fantastic black top hat. I was pleasantly surprised to see hair pieces included for the firefighters, usually they would have just their helmets. There are no dual-sided heads, but the headgear of five of the six minifigures would not allow them anyway.
The build begins with #1 bags, of which there are three. As usual, it starts with the assembly of some minifigures, in this case four of them, plus the dog which is one piece. Next in line is the sled with the baby and a present, followed by the bench and lamppost, after which the build moves onto the decorated Christmas tree with three presents (two of which are a train and a blue four wheeled cart/scooter with actual working wheels). Then the ice-skating rink is assembled and the final build of the stage is the fire truck which, in my opinion, looks a tad blocky, especially round the back wheel arches. 5 stickers are applied at this point, all on the fire truck. My set had 18 extra pieces in it. The Christmas tree was a little repetitive to build, since it consists of four identical layered wedge shaped sections. For me personally, the brick yellow stick that is inserted inside the tree and the stickers were the hardest bits of this part of the build.
Bags #2, of which there are three, build the musician minifigure and the bottom floor of the fire station along with a red fire hydrant and the snowman. No stickers are used at this stage, but my set had 11 extra pieces. There is some repetition when building the walls, and the red main doors are just mirror images of each other. The fire truck fits through the main doors (which open inwards), but its ladder must be down since there are only a few millimeters to spare. The musician with his saxophone ties nicely in with the singers from previous Winter Village sets.
Bags #3, i.e. the four final bags of this set, build one firefighter and the upper floor of the fire station. The build continues right on top of the ground floor, which means that this part of the build cannot be assembled before bags #2 are done and dusted. The five remaining stickers are applied at this stage, and I was left with 12 extras after the build was completed. The build technique for the ornate tower windows is simply super, and while the brick yellow 1x1 clips are quite tedious to align, they do look wonderful as a cornice (roof decoration). In my opinion, the bell, flag, and festive ornaments are all very nice details, as are the two rotating chairs and the coffee maker. The light brick on the roof is a welcome addition and helps bring the building to life. I noticed that the dog fits under the fold-down bed (its bone is placed there), but only just. Unfortunately, I found that the fireman's pole was a little difficult to use, especially if one has clumsy fingers and is spoiled rotten by a similar pole in 75827 Firehouse Headquarters. At one point, I mixed the colors black and dark blue which led to some confusion and I also struggled a little to build the structure around the silver bell.
The more uncommon parts in this set include the bright bluegreen baby body (Element ID 6217078), the black firefighter torso (6218607), and the brick yellow stick with a stop (6254770), all currently available in just this set. The white ornamental fence (6097236) currently appears in two sets (the other being Disney Castle), and the dark red 1x2 plate with a handle (6214312) and the dark blue toolbox (6135159) have been in 3 sets. The trans yellow ice crystal (6116738), the sand yellow hair (6162275), and, surprisingly, the dark red 1x1 brick with one knob on the side (6212007) which hasn't been seen in Lego sets since 2013, have been in 4 sets including this one.
When this year's Winter Village set was revealed, I had my doubts about it and could not see the relevance between Christmas and a fire station. Seeing the set in flesh (plastic?) and building it have totally reversed my opinion. I have only a few Winter Village sets from the past three or so years, but this is quite probably my favorite one thus far. What I love about the Winter Village Fire Station is its interior which was pretty much absent from last year's train station. The fire station is very ornamental and pretty to look at, the furnishings are top notch, and the designer has clearly paid attention to detail. In my opinion, this set ticks all the boxes: there are oodles of play features for those who actually play with their Lego sets, and also some complexity for those who just like to build and perhaps display their sets. I sincerely hope next year's set will be just as good!
"
I would recommend this to a friend!
My Product Recommendations
Winter Village Station
 (70)
(70)
Winter Holiday Train
 (97)
(97)
From:
Finland
Age:
35-44
years old
Customer Type:
LEGO Fan
Building Experience:
Intermediate LEGO builder
Purchased For:
Self
Play Experience (Optional):
5
/
5
Value for Money (Optional):
3
/
5
Level of Difficulty:
Easy
Very Easy
Very Challenging
I would recommend this to a friend!
Share:
+6points
11of 16found this review helpful.

Mining Team
Mining Team
Posted:March 17, 2018
amazed78
Age:
35-44
years old
Customer Type:
LEGO Fan
Building Experience:
Intermediate LEGO builder
Overall:
5
/
5
60184 Mining Team
" With its 82 pieces, 60184 Mining Team is the smallest of the Lego City sets under this year's mining sub-theme (the larger ones being 60185, 60186 and 60188). The pieces can be used to build four minifigures, a dumper with tipping bed, a glass walled thingamajig on a cupboard that the set designers call a research station, and a rock pile which has a built-in explosion function. Opening the box reveals two unnumbered bags and a 32-page instruction booklet folded in half. There are no stickers in this set.
The build is both very quick and easy and, as is quite usual for Lego sets, it starts with a minifigure: this time it is a brown-bearded male miner in an orange coat. Then it is time to build a small, mainly yellow and black tipper/dumper, which is finalized by placing a pickax and a shovel in its tipping bed. The dumper's build is divided into 10 steps. Next in line is a sweating male minifigure whose accessory is a red coffee mug. The glow-in-the-dark spider (element ID 6218845), a recolor for 2018, is one piece and does not need assembly. After this, a white and gray research station with blue-tinged glass walls gets built, which is a task of only 6 steps. A brand new piece, a gold ingot (design ID 35646), is placed inside the research station. Next build is two minifigures, a gray-bearded male miner in a white shirt and a female worker in dark blue clothes. There is also a bullhorn for the former and a detonation plunger for the latter minifigure. The final stage of the set completes a mainly gray rock formation with another new gold ingot inside and some red dynamite clipped to one side. This is the largest build of the set with its 16 steps. My set had a total of four spare pieces. For me, placing the dumper's tipping bed in its rightful place and the technic bits were the most difficult parts of the build, and they were very easy to figure out.
None of the minifigures in this set have dual-sided heads, mostly because their headgear will not allow it, which is a bit of a shame, but I'm glad to say that all of them have dual-sided new-for-2018 torso prints. In the description of the set, none of the four minifigures have titles other than 'miner'. However, I have a creeping suspicion one of the male miners is a foreman, since he is carrying a red bullhorn, and is the only one wearing a white shirt, a very impractical choice of color for a miner. His head with a serious-looking expression, gray eyebrows, sideburns and mustache is originally from Lego Pirates sets released in 2015. He is wearing sand yellow cargo pants with two large pockets at the front, and the aforementioned white shirt with dark gray suspenders, a radio and a notebook tucked in the pockets of an orange belt, and an ID badge. The legs are a new print for 2018, and the white mining helmet is a recolor. There is a yellow light attached to the front of the helmet.
The female miner's head, which features a lopsided smile and one raised eyebrow, is from 2017 when it was used in at least 11 sets. She has a dark brown ponytail cascading down from underneath a white helmet, which is a recolor for the 2016 Volcano Explorers product line. Her new-for-2018 legs are dark blue with an orange stripe running across the knees, and her torso is printed to look like she's wearing a dark blue shirt with an orange tool harness and dark bluish gray gloves, and is carrying a radio and an ID badge. Her accessory is a red and gray detonation plunger. The second miner has a frown and some sweat drops printed on his head. He is wearing a white mining helmet, an orange sleeveless shirt with dark blue suspenders and dark bluish gray gloves, while his trousers are dark blue and not printed. He is holding a red coffee mug in his hand. The last minifigure has a brown goatee-type beard and a broad smile, and is dressed in an orange jacket over a dark blue shirt, printed with an ID badge and a mining logo on the back. His trousers are also unprinted dark blue, and his construction-type helmet is white.
The explosion function works nicely, although it is a bit stiff. The tipping bed can be used to haul and tip nuggets but if it is tilted to the max it tends to get stuck on the dumper front wheels. The spider doesn't fit inside the cupboard under the research station completely, at least not with the door closed. I noticed the demolition plunger (if assembled) won't fit in either. Stuff that actually can be placed inside the cupboard: 1) dynamite, 2) gold nugget, 3) coffee mug, 4) bullhorn. There are no back or front walls for research station, and replacing the nugget inside it requires either some disassembly or really really small fingers. As the instruction booklet is folded in half it might be a little difficult to read, or that was my experience.
In my opinion, this is a great little set, with a nice selection of minifigures, a cool glow-in-the-dark spider, and some very good play features.
"
I would recommend this to a friend!
My Product Recommendations

Forest Tractor
 (18)
(18)
From:
Finland
Age:
35-44
years old
Customer Type:
LEGO Fan
Building Experience:
Intermediate LEGO builder
Play Experience (Optional):
4
/
5
Value for Money (Optional):
5
/
5
Level of Difficulty:
Very Easy
Very Easy
Very Challenging
I would recommend this to a friend!
Share:
+17points
21of 25found this review helpful.

Wild River Escape
Wild River Escape
Posted:March 4, 2018
amazed78
Age:
35-44
years old
Customer Type:
LEGO Fan
Building Experience:
Intermediate LEGO builder
Overall:
5
/
5
60176 Wild River Escape
" 60176 Wild River Escape is a smallish Lego City Mountain Police set. It consists of 126 pieces, of which one can build two minifigures, a red and gray raft with pontoons, and a mainly blue and white police speedboat. Opening the surprisingly large box means that out tumbles two numbered bags, a dark gray boat hull piece, an instruction booklet for 56 pages, and a small sticker-sheet of three stickers. Bag 1 builds a crook, a skunk, a paddle, and a raft with a detachable chest/loot box with three diamonds/jewels and a red crowbar inside, while bag 2 contains the pieces for a police officer and a police speedboat.
The crook has a delightful new-for-2018 dual-sided head, with a printed brown beard, an angry expression on one side and a scared or surprised expression on the other. He also has a new torso with printing on both sides (a red jacket over a prison shirt, a brown over-the-shoulder pouch and a dark red belt). His really cool reddish brown hair is on a small ponytail. The hair is a recolor of an older piece and the same color hair appears also in 60173 Mountain Arrest. Both the head and torso are currently available in three 2018 sets. Also the police officer has a new torso: a sand blue jacket with zippers, a white emblem on the left side, and 'police' written on his back in white, over a dark blue shirt. In addition, his sand yellow cargo pants also have a new print: that of two large pockets. His head (with printed sunglasses) sits a little higher than normal because the straps of his yellow life vest are in the way and prevent the head going all the way down to his shoulders. The police officer's torso is currently in at least three sets, while the legs are in seven sets that I know of. My favorite brick of this set, the skunk, is one solid piece, and its first appearance was in Collectible Minifigures Series 15 back in 2016.
The raft is a fantastic design, a really unusual vehicle, quite easy and quick to build, with some repetition because the raft is symmetrical and its four pontoons are identical. There are a total of 14 steps to complete the raft. The skunk does not fit inside the chest/loot box entirely because of its size, but fortunately can either peer out of the box or have its tail sticking out, which really adds another level to the play experience. The police speedboat has all the stickers of this set. Its build is quite easy, stickers being absolutely the most difficult part. There is repetition here as well, because also the police boat is symmetrical. I thought the windscreen looks very nice and sleek, and the outboard engine is both large and good-looking. It takes 39 steps to build the boat. My set had only four spare parts, all in bag 2, including handcuffs and and the parts to build a third front light for the boat (I use it as a flashlight). The outboard engine can be tilted and removed, and both of the front lights are detachable. There is enough space for a hand-cuffed crook at the back of the boat, or if there is no need to transport crooks, the loot box can be wedged between the blue slopes at the back of the boat. However, the fit is rather tight and it might be easier to transport the box in the other way around with the narrow side resting on top of the hinge of the outboard engine.
There is little room for improvement in this set, at least in my opinion. The only negative thing I could come up with is that there are no spare jewels. I think this is a problem only because the jewels are among those rare parts in this set that are not connected to anything, so they will be easier to lose. Although there are two holes in the bottom of the loot box that two of the jewels can be attached to (if one happens to have small and nimble fingers, and manages to place the jewels very carefully in the right position so that they fit next to each other), the third one will be loose. I also noticed affixing the jewels to the box means that the skunk will not fit inside the loot box as good as it does with the jewels unattached.
A marvelous little set for the fans of Lego City Police, speedboats, or rafting. Or perhaps skunks.
"
I would recommend this to a friend!
My Product Recommendations
Forest Tractor
(18)
From:
Finland
Age:
35-44
years old
Customer Type:
LEGO Fan
Building Experience:
Intermediate LEGO builder
Play Experience (Optional):
5
/
5
Value for Money (Optional):
4
/
5
Level of Difficulty:
Easy
Very Easy
Very Challenging
I would recommend this to a friend!
Share:
+8points
10of 12found this review helpful.
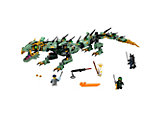
Green Ninja Mech Dragon
Green Ninja Mech Dragon
Posted:February 27, 2018
amazed78
Age:
35-44
years old
Customer Type:
LEGO Fan
Building Experience:
Intermediate LEGO builder
Overall:
4
/
5
70612 Green Ninja Mech Dragon
" 70612 Green Ninja Mech Dragon is a set of 544 pieces, and is based on The LEGO Ninjago Movie released in 2017. There are pieces for four minifigures and a 60 centimeter long, mainly sand green, gold and black, dragon mech inside the perhaps unnecessarily large box. Opening the box reveals four numbered bags (not surprisingly from 1 to 4), two instruction manuals, a sticker-sheet for 22 stickers (of which none are very large). The first manual is smaller in dimensions, but it comes with more pages (80), and there are 85 steps from cover to cover. The second manual has 68 pages, starts from step 86 and continues all the way to step 203. Both manuals and the sticker-sheet are loose in the box.
Lloyd is dressed in black ninja garb with green trimming, a green emblem printed on his back, green knee straps, and a green bandana adorning his otherwise black ninja head wrap. He is the only minifigure with a dual sided head, and, as far as I know, he appears in this exact form in at least four sets. The white-bearded angry-faced Sensei Wu wears a white robe with gray trim which has a red emblem printed on the back. The robe pattern continues to a printed cloth covering most of his legs, which are brick yellow with a brown sandal pattern printed on the toes. His conical hat is also brick yellow. Wu can be found in this exact form in two sets that I know of. Garmadon's attire is mainly black with some silver, gray and blue printing on his two torsos, and blue sash pattern printed on his legs. The upper armored torso with shoulder protection has printing only on the front, but the lower torso has it also on the back. Garmadon's dark blue robes are new and currently appear only in this set. His legs are in at least four, helmet in at least six, both head and his upper and lower torsos in at least five sets that I know of. The scar-faced Shark Army Gunner (Charlie) sports not only a stubble and a goatee, but also a gray and sand blue suit (possibly a scuba suit) with a printed utility harness sort of a contraption, gray trousers with some printed belts and knee pads, and a dark blue knit cap. As far as I know, the exactly same minifigure appears in three sets.
This set has two completely new parts: the sand green upper (element ID 6195100) and lower jaw (6195101) of the dragon. There are also multiple recolors of old parts, some of which are done for the first time in sand green: the dragon feet (6197561), the left 2x4 angled roof tile (6187609), the right 2x4 angled roof tile (6187610) which are currently available only in this set, the curved wall panel (6196587) makes an appearance also in set 70620 Ninjago City, the skeleton arm (6146094) is also in a Dimensions set from 2015, and the plate 2x2 with a knob (6186826) can be found in three sets released in 2017. Recolors in warm gold include the 2x2 plate with a stump (6195270), the 3.2 shaft with a hole (6197509), both of which are currently available only in this set, and the 2x2 plate (6162885) which can also be found in set 21136 The Ocean Monument. There is also one new print: the green display screen (6248920) from the cockpit.
Bag 1 has the parts for Lloyd with a sword and a tassel, and the chest section of the dragon (where its front legs attach to). This stage had four stickers, and I was left with four spare parts. Opening bag 2 reveals the parts of Garmadon's henchman (Charlie) with a harpoon-fish as a weapon, parts for the dragon's front legs, and the section where its back legs are attached to. Two stickers are applied at this stage of the build, and my set had seven spare parts. I thought the dragon's back spikes were a wee bit hard to align correctly. Bag 3 contains the parts to build both Sensei Wu with his staff and Garmadon, who is armed with two swords. Garmadon's cape and Wu's robe are in a separate cardboard box. There are also the parts for a brick-built laser pointer, the dragon's hind legs, all of the three tail sections, and the ball-jointed flared bits above its front legs. There were only four spares in my set, including two swords. The sticker-count for this stage is eight, and I have to admit I had a real hard time with one of the black stickers. Bag 4 has the parts for the dragon's neck/cockpit and its head. The lower jaw is in a separate protective bag. This stage has eight stickers and my bag had nine spare parts.
In my opinion, the build is not exceedingly difficult, though I abhor the technic bits and bobs in this set. I freely admit making a couple of mistakes with technic pins, but only one bigger mistake that required the use of a brick separator. There is some repetition because of the mech's symmetry, for example, its legs are mirror images of each other. I like the sand green, gold and black coloring of the mech dragon, which is what enticed me to purchase this set. The dragon's head is excellent, the ornaments that adorn the head are stunning, and there is even a movable tongue. I thought the building technique for the dragon's eyes was really clever. The printed green display screen is probably my favorite part, although I like the golden bananas as well. The tail sweeping function works really nicely, and there is enough friction in the lower jaw mechanism which makes it possible for the dragon to hold a minifigure in its mouth (should someone want to perform such an atrocity).
There are also some areas that could be improved upon: the first thing I noticed, before I had even finished the build, was that the tail is way too floppy. It simply wants to stay bent and switch sides pretty much uncontrollably, which seriously limits the swooshability of the dragon. I, personally, would not want to be slapped in the face by a spiked tail when trying to fly my mech around the living room. The two stud shooters are in a very tight and awkward place, which makes them prone to spontaneous combustion when trying to position the front legs. I also managed to pop off one of the sand green angled roof tiles when reloading the shooter. The dragon's head turns only sideways and rotates around its axis, when it definitely should also go up and down for a more animal-like feel. Some of the ornamental bits restrict the dragon's movement, especially that of the head and neck. The thruster cover panels limit the positioning of the front legs, and what really disturbs me is the fact that in my particular set the earth green 2x4 plate behind the dragon's left front leg has actually dug in and wrinkled a corner of the sticker on the thruster cover. I don't think such a thing has ever happened to any of my sets before this, but I'm the one that placed the sticker in the exact spot where the pieces rub together. And finally, this probably is a positive thing for the good guys, but I also noticed the width of Garmadon's helmet restricts his use of the laser pointer so that he cannot shoot straight.
For a fan of Ninjago, dragons, mechs, and/or the color sand green, this is a perfect set.
"
My Product Recommendations
Temple of Resurrection
From:
Finland
Age:
35-44
years old
Customer Type:
LEGO Fan
Building Experience:
Intermediate LEGO builder
Play Experience (Optional):
3
/
5
Value for Money (Optional):
4
/
5
Level of Difficulty:
Easy
Very Easy
Very Challenging
Share:
+2points
2of 2found this review helpful.
Forest Tractor
Forest Tractor
Posted:February 23, 2018
amazed78
Age:
35-44
years old
Customer Type:
LEGO Fan
Building Experience:
Intermediate LEGO builder
Overall:
5
/
5
60181 Forest Tractor
" The Lego City set 60181 Forest Tractor is a smallish set of 174 pieces and, if one follows the instructions, these pieces can be used to build one minifigure, a tractor, a log stand, two logs, and a chainsaw. Opening the box reveals two numbered bags, four giant wheels, a sticker-sheet for six stickers, and a 64-page-long instruction manual with approximately 48 steps from start to finish. The sticker-sheet, wheels and manual are all loose inside the box.
Bag 1 contains only 30 pieces, including those for the single minifigure, two logs, a log stand, a chainsaw, a shovel, and a small spruce tree (which is a single piece). Bag 2 has the parts for the tractor which is equipped with a moving log grapple and two chains. There was a total of five spare parts in my set. I was somewhat baffled when the instructions in my set started with step number 1, the next page had a completely different step number 1, and the next page showed step number 56. The rest of the build went without a hitch, and, in my opinion, the stickers were the most difficult part of the build. I have to admit the two dark gray technic hubs with four shafts (element ID 4222192) which serve as the legs of the log stand were a tight fit, and when assembling the tractor's huge wheels, I found it surprisingly difficult go get the rims inside the somewhat floppy tires.
The minifigure in this set is a male forest worker. Unfortunately he is not that remarkable a figure: his torso (a reddish brown shirt covered by a high-vis vest and dark gray gloves) has been available since 2015, and the same goes for the red helmet with black ear protectors. His legs are unprinted and blue. The only curious thing about the figure is his single-sided crookedly smiling and stubble-bearded head (element ID 6218244). It is nearly identical to that in 60095 Deep Sea Exploration Vessel, except for the dimple in his cheek, which is black in the older set and light brown in this set. The older version also has a different element ID number (4261572).
Undoubtedly, the main attraction of the set is the forest tractor, which has that certain "je ne sais quoi" that prompted me to purchase this set. It is a bright yellow-green, gray and black behemoth with a movable red arm that ends in silver metallic claws used for grabbing trunks of felled trees. There are two clips at the back of the tractor which the forest worker can use to transport his shovel and saw. There are neither doors for the tractor's cabin, nor a driver's seat, but there are side mirrors and a really fancy exhaust pipe. I tried to fit a seat on a turntable inside but there is simply not enough room for the seat to turn so that the minifigure can use both the steering wheel and the arm controls. Usually placing a minifigure inside a Lego vehicle involves removing its roof. In this case the cabin windows are so high that I found it better to remove the whole cabin, windscreens and all, before I could get the minifigure properly seated. In my opinion, the red and gray chainsaw was a really cool mini-build, and I also liked the log stand which shares the colors with the saw. The two reddish brown logs are identical, and both consist of six round 2x2 bricks (4211166) with a 2x2 round plate sprouting four vertical shafts (4648118) in the middle. The small green spruce tree was a much appreciated addition.
There are two new parts in this set: the new-for-2018 black bullbar/push bumper (element ID 6207258), and the bright yellow-green 1x2 brick with 2 knobs on the side (6208291). The latter is a recolor for 2018 and currently available in only three 2018 sets, while the bumper appears in seven 2018 sets, but I presume it will be used more widely in the future.
Every play feature works nicely: the moving arm has a good reach, the logs stay firmly inside the log grapple (I managed to stick in both of the logs simultaneously), and can be dragged behind the tractor using the two chains provided with the set. There is even a function for the small spruce tree: the back of the box clearly demonstrates a lesson in ecology by depicting the forest worker planting a new tree to replace the one he felled.
However, there is always room for improvement: the claws can be a little awkward to open and close, especially if one hand is occupied with keeping the tractor stationary, and a second minifigure would've been a great addition, though forest workers tend to work alone (at least in my country). There is also an extremely nice-looking newish piece, a 2x2 round tile printed with a tree's growth-ring pattern (element ID 6182435), currently available in sets 60171 Mountain Fugitives and 10738 Snow White's Forest Cottage, which would have been absolutely perfect for this set.
I wonder what would happen if the tree-costume guy from 60174 Mountain Police Headquarters happened to be in the vicinity of my forest tractor..?
"
I would recommend this to a friend!
From:
Finland
Age:
35-44
years old
Customer Type:
LEGO Fan
Building Experience:
Intermediate LEGO builder
Play Experience (Optional):
5
/
5
Value for Money (Optional):
4
/
5
Level of Difficulty:
Easy
Very Easy
Very Challenging
I would recommend this to a friend!
Share:
+3points
6of 9found this review helpful.
Temple of Resurrection
Temple of Resurrection
Posted:February 21, 2018
amazed78
Age:
35-44
years old
Customer Type:
LEGO Fan
Building Experience:
Intermediate LEGO builder
Overall:
5
/
5
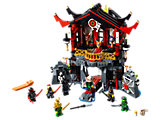
70643 Temple of Resurrection
" The Lego Ninjago set 70643 Temple of Resurrection is a set of 765 pieces. Those pieces can be used to build a two-story temple, 7 minifigures, a baby in a rucksack, and a skeleton figure. Instead of the push tabs usually present in smaller sets, the box of this set is closed by plastic seals. The instruction booklet and sticker sheet are both inside the same protective plastic bag, and there are a total of six numbered bags inside the box. A closer inspection of the instruction manual reveals a total of 144 pages, and an impressive 202 steps from start to finish. The sticker sheet contains 10 stickers, two of which are quite large.
The color scheme of the rather large temple is gray, red, black and gold, with some white, blue (for water), and green (for some vegetation) thrown in for good measure. It appears that the temple is situated on top of a rock formation jutting out from a body of water, and if one really squints one's eyes, in the "evil mode" the temple looks like a white-fanged monster with its red tongue sticking out.
All of the 7 minifigures seem to be either completely new figures for 2018, or at least have an updated printing on their bodies. All minifigures have printing on both sides of their torsos, but unfortunately only Lloyd and Cole have heads with alternate expressions. Cole is wearing a ninja head wrap with a dark brown bandana-style headband, a black sleeveless top with gray and orange trim, brown stippling, Ninjago characters and a sash printed on it, black trousers (also stippled with brown) with gray knee wraps, and a scabbard for two swords. Lloyd is similarly dressed in a green head wrap with a black bandana, a scabbard, and a green robe with a gray sash, knee wraps and green stippling all over his robe and trousers. Harumi's face is heavily made-up, while her dual-molded headpiece has white hair in a ponytail on top and some kind of a crown-type golden thingamajig circling her head below the hair. She is wearing a white cape with red printing. Her clothes, a long dark green robe on top of a shorter one, are different shades of green with gold and red trimming and she has golden sandals printed on her toes. Hutchins has a gray beard and a patch over his right eye. He wears a golden helmet and golden shoulder armor. His clothes are green, with gold and black trimming, gold letters printed on the right side, and gray squares on his toes.
Mr. E is dressed in black and red: a black helmet with a red visor, black shoulder armor, a black jacket with gray, white and red printing, red gloves, and black trousers with red knee pads. His head is completely black with white eyes rimmed with red. Chopper Maroon is also a fan of red and black: his hair is shaved from both sides leaving a strip of longer, red hair in the center, and his scarf and clothes are black with silver and white printing on the torso. His face has a distinct skull-like appearance and he has silver stars printed on the forehead. Chopper Maroon is the only minifigure in this set with unprinted legs. The four-armed, red-eyed Lord Garmadon might be described as smiling. His samurai helmet is black as is his head and body. His armored upper torso has shoulder pads, and silver, gray and purple printing on it, while the lower torso has gray ribs and a blue sash (which continues down his legs) printed on it. As far as I know, Harumi and Hutchins are currently available only in this set, while the other minifigures (or slightly different versions of them) can be found in other sets as well.
There are some new or rare pieces in the set: the three Oni masks (Mask of Hatred, Mask of Deception and Mask of Vengeance) are new parts for 2018, as well as the green 5-petaled flowers (design ID 24866). The red ninja sword (design ID 21459) of Mr. E is a recolor, as is the black kendo mask (element ID 6197924), the red technic lever (design ID 11478) and also the golden ornamental fence piece (design ID 32932).
Stage 1 (bag 1) contains the pieces to build Lloyd, Cole, a baby in a rucksack, and the center part of the ground floor of the temple. First two stickers of the set get applied at this point. The build is rather repetitive because the building is symmetrical. I thought the pieces used for this part of the set were quite big, however I was left with 11 spares, which may tell a different story.
Stage 2 (bag 2) starts with piecing together 4 minifigures: Harumi, Hutchins, Mr. E, Chopper Maroon, and the skeleton figure, for whom there was an extra leg in my set. This stage builds the two hinged side pieces of the temple ground floor that look like rock formations, and the detachable gangway. The rock wall on the right side does not close all the way because the spider web inside is too thick. I thought the parts used were on the smaller side, which is corroborated by the fact that in the end I had 16 spare pieces, including a red sword, Chopper Maroon's cool red hairpiece, and two black scarfs. This stage is sticker-free.
Stage 3 (bag 3) reveals the pieces for the ground floor roof (or perhaps the floor of the temple) with two trap doors. Most of the parts are very large, with only two spare parts, but, much to my chagrin, there are technic pieces and upside down building involved, too. Two stickers are applied to two white flags hanging down the sides of the temple.
Stage 4 builds the side walls of the upper floor/temple, plus the gold railing in front, and the center part of the back wall. The parts used are relatively large, my set had only three spares after finishing this stage. There is, again, some repetition because of the aforementioned symmetry of the building.
Stage 5 contains the pieces for two turning wall sections of the temple back wall along with some menacing technic gears or whatnots that form a part of the roof mechanism. I was left with eight spares. This is the stage where the two largest stickers are pasted on white window panes. The instructions suggest that the stickers should be applied after the panes are placed inside their black frames, but I found that exceedingly difficult (read: an absolute disaster, but the stickers were still intact even after two or three peelings-off). I think that it might be a good idea to try to apply the stickers on loose panes first.
Stage 6 starts with building the remaining minifigure (Garmadon) but the majority of the parts are dedicated to the roof and its good-to-evil transformation function. The two roof sections are very similar, but not identical, and (sort of) are in mesh with each other when the mechanism is used. This stage of the build consists of some upside down building, and piecing together a variety of very intimidating technic bits. The last four stickers are applied, but I found them easy-peasy compared to the ones in the previous stage. My set had eight spare pieces after completing this part of the build. I had a really hard time putting the roof mechanism together, in fact, I thought I would never ever finish the set. Hands down, the absolute worst, nightmare-inducing bit was getting the reddish brown cross axle with a stop (element ID 6159763) to slide into the red 1x2 brick with a cross hole (6196217) without actually seeing the position of the hole in the brick. As it turns out, the key to resolve the situation was to follow the instructions precisely to the letter and replicate the positioning of the moving roof sections and those of the brown axles exactly as pictured on the instruction booklet. And I do mean exactly, I cannot emphasize this enough. In my set, the mechanism is extremely stiff and I'm pretty sure I've put the pieces together either too loosely or too tightly. Neither tweaking the mechanism nor removing and replacing some of the parts involved has not loosened the mechanism at all, but do I confess I am very bad at building with technic parts.
The majority of the build is on the easy side, although I did make a few minor mistakes along the way, but for me the most difficult part was the horrid technic pieces, followed closely by aligning the two large window stickers. I strongly suspect these bits might be too difficult for at least some eight-year-olds to handle on their own (the set is suitable for children between the ages of 8 and 14) and suggest some kind of adult supervision for the last two stages of the build. As it turns out, I actually finished the set without rolling on the floor kicking and screaming, and apart from the completely botched window stickers and near-failure to complete the roof, the rest of the build was in fact a pleasure. There is some innovative and curious use of parts (such as white rims used in lanterns), the set is aesthetically very pleasing, and full of interesting and cute details. Even the stickers are pretty and enhance the appearance of the temple. The main reason I chose to acquire this set were the immensely cool Oni masks and minifigures, which certainly lived up to my expectations, so the aesthetic side was a bonus for me. The set is not just a pretty thing, it is also very sturdy and can be lifted as one piece without stuff falling off. There seems to be a perfect balance in this set: it not only looks good, but it also has a ton of play features and/or accessories, and even a back wall for the temple!
There are a couple of things in this set that I think could be improved upon:
1) When Garmadon is standing on his (very small) plinth between the flames near the apex of the roof there is very little room for his arms: if extended, they will snag on the roof bits when the good-to-evil function is used.
2) The hinged rock formations tend to just flop open revealing the secret contents to all and sundry. A locking mechanism would have been greatly appreciated.
3) The revolving walls have to be operated by hand. Some kind of contraption to turn them both simultaneously would have been nice. "
I would recommend this to a friend!


From:
Finland
Age:
35-44
years old
Customer Type:
LEGO Fan
Building Experience:
Intermediate LEGO builder
Play Experience (Optional):
4
/
5
Value for Money (Optional):
5
/
5
Level of Difficulty:
Challenging
Very Easy
Very Challenging
I would recommend this to a friend!
Share:
+8points
17of 26found this review helpful.