amazed78
Top 100 Contributor
Share amazed78's profile
amazed78's Stats
amazed78's Stats
- 4.7Average Rating
- 563Helpfulness Votes
- 0Featured Reviews
- 94Review Count
- February 18, 2015First Review
- December 25, 2018Last Review
Women of NASA
Women of NASA
Posted:November 15, 2017
amazed78
Age:
35-44
years old
Customer Type:
LEGO Fan
Building Experience:
Intermediate LEGO builder
Overall:

5
/
5
21312 Women of NASA
" 21312 Women of NASA is the 19th Lego Ideas set, but certainly not the first to 'slip the surly bonds of Earth'. If I have counted (and understood what my eyes were seeing) correctly, four of the previous Ideas sets are somehow connected to space exploration, making this set the fifth. This particular set has 231 pieces, which means it is the second smallest of the Ideas sets to date. The mainly blue box looks like a luxury item, it seems very sturdy and looks positively glossy. The box is closed with two plastic seals. There are pictures of the set on both front and back of the box, and the back side shows actual photos of the real women on whom the four minifigures of the set are based. Unboxing the set leaves me with three unnumbered bags and a stapled instruction booklet with 68 pages. The booklet begins with an introduction of the four women of NASA: Margaret Hamilton, Sally Ride (I was sad to find out she has passed away), Nancy Grace Roman and Mae Jemison. Then the fan designer, Maia Weinstock, gets to say a few words, after which is the turn of the Lego designers to be interviewed.
The build starts with all of the 4 minifigures: Margaret Hamilton has her glasses on and is attired in a knitted (?) black dress and there are black shoes with silver buckles printed on her feet. In my opinion, those shoes are fantastic! Sally Ride is wearing a medium blue NASA uniform of sorts with printed pockets and badges at the front and is taking photographs. Nancy Grace Roman is also bespectacled, has printed pearls around her neck, and is dressed in a what might be a white cardigan over a white shirt, and brick yellow trousers. Mae Jemison is attired in a bright orange spacesuit and is carrying a white helmet. All of the four torsos are dual-sided, as are all the heads, too. Margaret Hamilton's legs are both dual-molded and printed and I think her hairpiece in medium nougat (Design ID 92083) is a recolor.
After the minifigures, the build progresses to their stands: Margaret Hamilton's stand (with a stack of blue and white books and what might be a whiteboard with some notes on it) gets to be built first, then the dual stand for Mae Jemison and Sally Ride (naturally including the white, black and orange space shuttle), and the last is Nancy Grace Roman's stand with the mainly gray Hubble telescope and an image of a planetary nebula. There are 22 steps to build the first and last stands, which are the smallest, and 39 steps for the biggest stand including the shuttle, of course. None of the stands are exactly identical, but there are some similarities, such as attaching the name plates. Much to my delight, I noticed that everything is printed, there are no stickers in this set. When the build was completed, I had 13 spare parts left.
The build is very easy and quick, I made only one mistake with the corner plates of the shuttle wings. For me, the most difficult part of the build was attaching the two smaller white rockets to the orange fuel tank. It was surprisingly complicated to get the white bits to connect with those elusive black connector pegs, and I had to do it twice! But still, I loved the space shuttle and the Hubble to bits, they are such clever builds! Especially the super-detailed Hubble, which is the last thing to be built. It consists only of 20 or 21 parts, depending on whether you count in the black bar which attaches the telescope to the stand. I was glad to see the set is easy to store away when not needed: the two smaller stands are both five studs deep and the large is six studs, therefore the smaller stands fit inside the glossy box even when assembled (but with the Hubble removed), while the larger one does not. Also the quite bulky shuttle needs to lose its detachable fuel-tank-and-rocket-combo in order to fit back in the box.
Almost all of the printed pieces of this set, including the minifigure torsos, heads and the one pair of legs, are new and currently exclusive to this set. The only exception is Sally Ride's head (Element ID 6162427) which appears also in a Dimensions set (71257). This set marks the return of the black fez (6203937), previously only available in the Collectable Minifigure Series 4 (Soccer Player) and more recently in 21309 NASA Apollo Saturn V, the white 1x1 round plate with a shaft (6174937) can also be found in three sets, as well as the black 1x1 plate round with horizontal shaft (6196548). I was quite surprised to find out that this is only the fourth appearance of the bright orange 2x2 round brick (6120639) with a hole for technic pins.
There were a couple of things that left me a teensy bit mystified:
1) The instructions clearly show the Hubble is displayed with the garbage can side facing the viewer, while the box art has images of the Hubble facing the other way.
2) Garbage can connection of the Hubble is a bit fragile and tends to snap off.
3) The brown coatrack attached to Margaret Hamilton's stand was a bit baffling, but after a quick internet search I see it is obviously from the black-and-white photo of her which was the inspiration for the whole stand.
4) No lens for Sally Ride's camera.
I really like this set a lot, though it is slightly on the more expensive side. In my country it is 5 cents per piece more expensive than the Old Fishing Store. But let's face it: 21312 Women of NASA is certainly a must-have for those who love space-related Lego sets. I can see an enthusiastic builder creating an entire space-themed museum around that fantastic mini-Hubble and mini-shuttle. As a side note, I would strongly recommend doing a more thorough internet search on each of the women to find out more about their fascinating lives.
"
I would recommend this to a friend!
My Product Recommendations
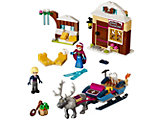
Old Fishing Store
 (121)
(121)
From:
Finland
Age:
35-44
years old
Customer Type:
LEGO Fan
Building Experience:
Intermediate LEGO builder
Play Experience (Optional):
5
/
5
Value for Money (Optional):
4
/
5
Level of Difficulty:
Very Easy
Very Easy
Very Challenging
I would recommend this to a friend!
Share:
+7points
8of 9found this review helpful.
Winter Village Station
Winter Village Station
Posted:November 13, 2017
amazed78
Age:
35-44
years old
Customer Type:
LEGO Fan
Building Experience:
Intermediate LEGO builder
Overall:
4
/
5
10259 Winter Village Station
" 10259 Winter Village Station is the latest addition to the seasonal, holiday themed Creator Expert product line. The set contains 902 pieces, which, if I have my facts straight, makes it the third largest Winter Village set so far. The box has a lot of pretty pictures of the set printed on a wintry blue background with stars and snow falling on already snow covered trees. It is not sealed by strips of plastic tape but glued shut and equipped with two push tabs, which means resealing the set after holidays might get more complicated. When emptied, the box reveals nine numbered bags, four pieces of straight rail, and two instruction booklets plus a sticker sheet for 11 stickers in a bag of their own. Manual #1 has 40 steps spread over 48 pages, whereas manual #2 has 92 steps and 64 pages.Three of the bags are numbered '1' and six are numbered '2'.
The set includes five minifigures: a bus driver, a barista, a grandmother, a child, and a ticket agent. The bus driver is wearing spectacles and he has a brown beard. He is dressed in a blue jacket with several pockets over a red shirt, black trousers, and a black knitted cap. Around his neck is a red scarf, which is a separate piece. The barista has her brown hair in a ponytail and is wearing a reddish brown apron with an image of a coffee cup and a name tag over a white shirt and sand blue trousers. The bespectacled grandmother has decided to combine a light royal blue knitted (?) sweater with dark red trousers, and has braided her long dark gray hair. The child (a boy) has put on a dark azure hoodie over a lime green striped shirt, dark green trousers, and a dark red baseball cap. The ticket agent has short dark brown hair with a side part. He is wearing a white shirt, a red tie, and a dark blue uniform printed with the Lego City train logo. None of the minifigures have two-sided heads, which is a bit of a letdown. Three of the torsos are printed on both sides, and the barista's legs are the only ones with a print.
Stage 1 (i.e. the bags with #1 printed on them) builds, among other things, three of the five minifigures: the bus driver, the grandmother, and the child. After completing the minifigures the build progresses to two mainly black lampposts, both with a green wreath hanging down one side, then to a snowy railway crossing with two red and white boom gates/barriers and two stickered road signs. The final steps of this stage build a bus and three presents on its roof. The bus is mainly yellow and white with a black horizontal stripe running across the sides, a green wreath on each side, an opening front door, and a detachable dark blue roof with a rack for the presents. I thought the bus was a nice build with some neat details (off-center front licence plate, split windscreen) and an extremely charming 1930's or perhaps 1940's look. In my opinion, the bus is so cute it would sell as a small holiday themed set of its own. I was left with 18 spare parts after finishing this stage, so quite a lot of small bits and pieces are included.
Stage 2 builds the last two minifigures (the barista and the ticket agent). The main build of the whole set is of course a (train) station. The station has snow covering its roof and the rest is all earthy tones; browns, gray, sand green, and some black. I spied with my little eye quite innovative parts usage, namely microphones and friction cylinder bits as columns/pillars, and the technique used for angling the clock tower was very neat indeed. There is some repetition and stacking of small parts involved in the building of the station. I thought that the 1x6 sticker with 'Winter Village' printed on it was very hard to align, but luckily the stickers can be peeled off at least once without damage. I strongly recommend using tweezers when battling them. The building has no back wall, which is no surprise for those who have purchased one of the older sets (such as 10245 Santa's Workshop or 10249 Winter Toy Shop). The very final step is attaching the two lampposts from stage 1 to the station platform, and if I counted correctly there were 17 leftover parts.
The build is not very complex or time-consuming. I, personally, made only about five minor mistakes (most of them color mishaps) during the whole of the build. The bus seems to be pretty sturdy and the three presents are, I'm glad to say, not loose on the roof rack, which prevents them falling off when the bus is played with. However, the back seat of the bus came off every time when trying to remove a minifigure from it. I also noticed that the grandmother cannot sit at the back of the bus because her hairpiece is too long, but the child fits in perfectly even though he is standing on the seat. The railway crossing boom gates/barriers cannot be fully raised up, but the bus can still be driven past them. The coffee shop side of the station is quite small, but there is lots of room for the ticket counter. I would have added a little more height to the station, a ladder to the attic, and a waiting area near the front entrance. Unless one has three or four hands, I would not recommend picking the station up when the four track pieces (including the crossing) are attached to the building. The two are connected only by four studs, after all.
As suggested by the box art, I did combine last year's 10254 Winter Holiday Train with Winter Village Station and noticed the train in last year's set happens to be exactly four rail pieces long. Also both the color scheme of the small waiting platform in 10254 and the structure of its lamppost match those of Winter Village Station very well indeed. There are no actual instructions on how to combine Winter Holiday Train with Winter Village Station. Since the train track of the older set is perfectly circular, the four straight train tracks need to be added in batches of two to the opposing sides of the circular track which means the railway crossing will not fit right next to the two-rail-pieces-long station, as shown in the instructions. I think this might perhaps cause some head-scratching among some of the newer and/or younger fans of Lego.
Some of the bricks and pieces in Winter Village Station are either new, newly recolored, or otherwise slightly on the rarer side: the three clocks (Element ID 6195246) represent a completely new and currently exclusive print. This set marks the first appearance of the dark blue 4x6x2/3 roof piece (6195326), the gray microphone (6199163), the medium nougat 1x1x2 design brick (6192919), the medium nougat 1x2 technic brick with a hole in its side (6192920), and the yellow 1x6x2 arch (6192924). The pieces making a second appearance (or the ones I was able to spot) are grandmother's dark gray hair (6129149) the first appearance being in 70751 Temple of Airjitzu, the brick yellow 2x2 newspaper tile (6135300) the first appearance being in 75827 Firehouse Headquarters, the black 2x2 round plate with one hollow stud in the center (6195325), and the brick yellow 1x2 2/2 angular plate (6174925). And finally, pieces that have been in three sets (or those I noticed) are the white 1x2 tile with 'Ticket' printed on it (6192534) and the new-for-2017 1x1 round plate with a horizontal shaft (6196548) in black.
On the whole, I think 10259 Winter Village Station is a lovely addition to the Winter Village theme and it was sorely needed, too. There have been two trains in the product line, but no stations until this set. The build may not be complex, but is a lot of fun, especially if one is a fan of winter, trains or old looking automobiles. I'm already excited to find out what next year's Winter Village set will be!
"
I would recommend this to a friend!
My Product Recommendations
Winter Holiday Train
 (97)
(97)
Winter Toy Shop
 (142)
(142)
From:
Finland
Age:
35-44
years old
Customer Type:
LEGO Fan
Building Experience:
Intermediate LEGO builder
Play Experience (Optional):
4
/
5
Value for Money (Optional):
4
/
5
Level of Difficulty:
Easy
Very Easy
Very Challenging
I would recommend this to a friend!
Share:
+5points
6of 7found this review helpful.
Old Fishing Store
Old Fishing Store
Posted:November 2, 2017
amazed78
Age:
35-44
years old
Customer Type:
LEGO Fan
Building Experience:
Intermediate LEGO builder
Overall:
5
/
5
21310 Old Fishing Store
" 21310 Old Fishing Store is the 18th set of the Lego Ideas line. It has 2049 pieces which makes it, thus far, the largest Ideas set. The box is quite nice looking with images of the set and some fishing gear superimposed on sand green planks at the front of the box and brown ones at the back. When opened, the box reveals 16 bags, all numbered from '1' to '7', and a 32x32 stud brick yellow baseplate. There are three bags dedicated to stages 1 and 7, while each of the other stages have two bags. The instruction manual and a sticker sheet of 11 stickers are in the same protective bag. The manual has 276 pages and 313 steps to complete the model. It starts with a short introduction of the fan designer, Robert Bontenbal, and the Lego designer's account of how the set was transformed from a fan design to an actual Lego set.
There are four minifigures included in the set: a captain, a fisherman, a fisherwoman, and a child. The captain is wearing a brick yellow knitted Aran jumper/sweater and dark blue trousers, and his white hat with a black visor and a gold braid is in a bag of its own. The fisherman is dressed in olive green overalls over a stained gray shirt, a dark gray pixie cap, and black boots, whereas the fisherwoman is sporting a brick yellow vest with multiple pockets over a white T-shirt, and sand blue trousers with dark green boots. The child (a boy) is wearing a dark azure hoodie over a green striped shirt, light gray trousers, and a white cap. Unfortunately, none of the heads are two-sided, but the fisherman's head is brand new. All three torsos of the adult minifigures are also brand new prints and the two dual-molded leg assemblies with boots are also new recolors.
The three bags printed with number '1' reveal all four minifigures of the set. This stage also builds the basement for the building, especially that of the watchtower side. I noticed that the bricks used are quite large, and there is some repetition when building the seven fenced assemblies that are placed under the tower. No stickers are applied, yet.
Stage two of the build concentrates mainly on the lower part and floor of the bait shop, but also the floor of the tower office floor gets finished. At this point of the build I have only 7 spare pieces, so there aren't that many small bits. Still no sign of stickers.
Stage three is where the first three stickers get pasted on. This stage builds some of the bait shop interior and outer walls of the building, and completes both the tower office and the lower part of the opening wall with hinges, and as the bricks ran out, I was left with nine spare parts. I was pleasantly surprised to see that the 2x2 newspaper tile on the office desk was a new print with a fireman, a cat and the caption "The greatest hero ever!". The inventory printed on the last pages of the instruction manual still shows the picture and number for the old tile (4655208), so I'm not sure that every set has the new variant of the tile.
Stage four adds mainly to the wall height of the building, but also a cash register and other accessories to the shop. Another two stickers are affixed to different pieces, I found the one sticker that attaches to a glass pane especially difficult to align. This stage ended with me having 12 spare parts in my hands.
Stage five is not as much about adding to the building as it is about accessories. Extremely cool and useful accessories, I might add, though I wonder what kind of fishing a box of TNT and some dynamite sticks are meant for. The first 12 steps of this stage depict the assembly of various decorative elements, either adding to the interior of the bait shop, or just cobbling together actual accessories one can play with, such as boxes of lobsters or fish. Having written that, there are also bricks to build both the upper part of the opening back wall with hinges, and the triangular reddish brown gables of the roof. My set had 11 spare parts after the completion of this stage.
Stage six introduces some more sand green shingling (or perhaps cladding) of the walls, three seagulls, a cat, the rest of the stickers, and the roof over the shop. A small amount of upside down building, which I'm very bad at, is done on the roof part. This stage yielded me a meager four spare parts.
The three bags printed with number '7' are the final stage of the build, and the bags contain the bricks and pieces to finalize the watchtower. The tower is adorned by a weathervane, a ship's wheel, two crabs, and there is even a golden telescope on the balcony. I was left with eight spare parts when the last stage was finished.
The build of this set does take some concentration, but in my opinion it is not overly difficult. However, I found that small and nimble fingers would have been a good thing to have. I thought I'd build this set without any major mistakes, but at some point I managed to turn the detachable roof over so that the majority of the hinged parts were put in wrong. The roof would have looked just fine even with the mistakes, but I wanted to complete the model the way it is depicted in the manual, so I had to pull some of it apart. I, personally, would have built some bits of the set in a different order, such as adding the cheese slopes on top of the rocks and stacking 1x1s, otherwise the piles of tiles and/or bricks may look a bit wonky, unless that is the look a builder is aiming for. Also some of the accessories can be quite difficult to add to the shop interior if one happens to have larger hands, therefore an earlier addition of these pieces might have been a good thing. There is some repetition, for example almost all windows are identical, and the sand green wall cladding looks the same throughout the build, but to me it was barely noticeable, I was enjoying the build too much to be bothered with such trivialities. The build offers no revolutionary building techniques (or else they sneaked by me), yet still managed to fill me with awe. I like the color scheme of the set very much. I also like the smooth finish of the walls and that there is only a limited number of studs left exposed. For some reason, I always struggle to put the roof on top the store when the detachable part of the tower is in its rightful place. It seems to be easier to do so with the tower removed.
For those looking for new or rare parts, I will list a few: Completely new printed parts, which are currently exclusive to this set, are the printed flat 2x4 tile which spells 'Anton's Bait Shop' (element ID 6205749) and the flat 1x2 tile printed with 'Hooks' and a lure (6205746). There are also a few recolors, this is the first appearance of a medium nougat 1x4 plate (6167700), a red lifebuoy (6202627), and an olive green 1x2 masonry brick (6202628). The dark stone gray 2x3 tile (6187008) is currently available in only two sets, and both the captain's hat (6179574) and the seagull (6208794) have previously appeared only in the Collectable Minifigure Series 10 where they were the accessories of Sea Captain. The reddish brown fence 1x4x2 (6202676) was previously used in one set back in 2014, and prior to this set, the olive green 1x8 brick (6058219) has been used (in abundance) only in 10243 Parisian Restaurant.
And now to the nitpicking section:
1) Interior is too small for big hands.
2) No room for a minifigure to walk through to the cash register, the passageway is too narrow. The same goes with the doorway to the tower, which is only two studs wide while a minifigure is close to being four studs wide.
3) The 1x1 transparent tiles (the ice inside the lobster crates) in my set look yellowed when compared to with the transparent cheese slopes.
4) The opening wall parts chafe on each other just a tiny bit.
5) Sticker glue is very strong, and leaves residue behind if the stickers are placed wrong and then removed for adjustment.
6) The anchor is left loose.
7) "Backyard" a bit empty, some grass (for example olive green flower stems) would have made a huge difference. Also, no visible access to the backyard, perhaps there could have been a ladder down from the tower section.
On the whole, I think Old Fishing Store is a fantastic set. I don't fish and I don't even like the taste of fish, but I knew I had to buy it. In my opinion, it is the best Ideas set so far. The overwhelming number of accessories in the set makes other, larger sets look sparse (I'm looking at you Grand Emporium). Yet every detail seems to have been thought through with care: there is even a ladder to the top of the tower. Old Fishing Store is definitely in my top 5 of favorite Lego sets. I would especially recommend this set for those who love Lego buildings and fishing.
Ps. If someone is looking to add even more sea-related stuff to the set, at least these things were omitted from the original: a trident (design ID 92290), a clam/shell (6092203), some string netting, and a starfish (design ID 33122). If one is really out to catch something big with a fishing rod, there are also larger animal molds for an octopus, a shark, and a dolphin.
"
I would recommend this to a friend!

From:
Finland
Age:
35-44
years old
Customer Type:
LEGO Fan
Building Experience:
Intermediate LEGO builder
Play Experience (Optional):
5
/
5
Value for Money (Optional):
5
/
5
Level of Difficulty:
Challenging
Very Easy
Very Challenging
I would recommend this to a friend!
Share:
+26points
28of 30found this review helpful.
Posted:June 11, 2017
amazed78
Age:
35-44
years old
Customer Type:
LEGO Fan
Building Experience:
Intermediate LEGO builder
Overall:
5
/
5
10255 Assembly Square
" The new 10th anniversary LEGO Creator Expert modular building 10255 Assembly Square contains 4002 pieces, while the other modular sets usually have a piece count of little over 2000. Even the colorfully printed box is of a substantial size: approximately 47,5 x 16,5 x 58 cm. Unboxing the set reveals a smaller white cardboard box with 6187649 printed on it, a loose instruction book of 308 pages, a 32x32 stud thin green baseplate and 19 bags numbered from 4 to 6 which lead me to believe the bags from 1 to 3 are inside the smaller box. Surprisingly, the instruction book in my set was not badly crumpled, the only damage is some wrinkling of the upper part of the back cover and one corner. The white box has push tabs and inside are a green 16x32 thin baseplate, 15 bags numbered from 1 to 3, and a gray 8x16 plate. At least in my set, the two green baseplates do not match in color, the smaller one is a little darker shade of green than the larger one.
The 4002 bricks can be used to build eight minifigures, a baby, and a 48x32 stud town square with two or three - depending on one's viewpoint - more or less interconnected buildings. The build is quite challenging, which meant that I made numerous mistakes during the build. One of my most visible mistakes was lining one column (out of ten) of those pretty sand blue profile bricks (element ID 6177135) so that the stripes were vertical instead of horizontal. The beautiful bakery windows were easy to assemble, but surprisingly difficult to attach to the bricks that hold them upright and some of the tilings took a lot of effort to get just right. Some parts of the build require stacking 1x1 bricks or 1x1 plates (or both!) on top of each other and I find lining them up properly very unpleasant and time-consuming.
There are a number of new or newish parts included in this large set: the printed dentist's window (element ID 6177280) and the printed flat 2x3 tile (6177290) are currently exclusive to this set. Other new parts include the blue and yellow parrot (6178520), the white chicken (6063271), which are both currently exclusive to this set, the new corner door frames in white and black (6177157 and 6177156), the brick yellow 1x1 brick with two knobs on adjacent sides (6175968), the 45 degree roof tiles with no studs (design ID 28192) and the curved tiles (6163990 and 6163989). There are also some recolors of older parts such as the black bow window (6177083) and the light royal blue 2x2 tile (6162894), and, quite surprisingly, the reddish brown 1x1 flat tile (6133854) which is currently only available in 71042 Silent Mary and this set.
The build starts with the bags numbered '1'. This stage contains only 3 bags, and inside those three baggies are the pieces for all the cool tilings for the ground floors, the base of the fountain and, for some obscure reason, a baby's black and red pram/baby buggy, which has gray stationary wheels. The green baseplates are not very firmly attached at this point of the build and can be easily pried apart.
Opening the bags numbered '2' reveals the first two minifigures: a male baker (with a white shirt, gray trousers and a white chef's hat) and a gray-haired female florist (dressed in lavender jacket over a lighter lavender shirt and brick yellow trousers). This stage builds the ground floors for the bakery and the flower shop, which are situated on the right-hand side of the square. However, after running out of bricks, I noticed the florist’s shop is still not completely finished. In my opinion, the cakes and flower bouquets are marvelous. There is an abundance of nice details and even one mechanism for the opening oven door. I think the bakery windows (originally transparent garage door panels) are pure genius! There is some nice upside down building above the bakery main entrance, and the wedding cake is quite fantastic. The two baseplates are now quite firmly attached, which is a relief. Nevertheless, there are also some things that bothered me when I completed this stage: there are two really ugly black bricks on the bakery back wall, one brick yellow 1x1 plate came off the floor when I removed the florist from behind her counter, and the upper back door to the bakery does not open completely.
Stage 3 begins with piecing together a female barista minifigure with a black pageboy bob. The barista's torso with a brown apron top over a white shirt and sand blue legs with a printed brown apron hem are identical to those in the set 60097 City Square. This stage builds the ground floor of the café and the upper part of the florist’s shop. These two buildings are so interconnected that it was not possible to finish the florist’s shop at stage 2. I thought the café furniture is very cool, and I love both the sign above the café door and the flowers above the florist’s shop door. Again, this stage contains an abundance of realistic details which, I presume, required a lot of thought. Negatives: cramped spaces (esp. behind the counter); the red mugs are nigh on impossible to use; the chairs outside the café are a bit wonky, and the detachable back wall section of the florist’s shop tends to detach the bricks underneath it as well. The fountain is still unfinished, which might be troublesome if and when the set is disassembled for storage.
There are two more minifigures at stage 4: a sand yellow haired male dentist (with a brand new white lab coat torso with some dentist's tools sticking out a breast pocket, white gloves and brown trousers) and a mustachioed photographer (dressed in a black beret, a gray hooded shirt over a dark red shirt, and sand yellow trousers). The result of finishing this stage are a dentist's office and a photo studio which are located above the florist’s shop and bakery. Previously, there has been very little repetition in this set but this stage definitely has some, however, the wall height of the upper floors is much better for playing. I love the printed window that says "Prevent Yellowing"! The old-fashioned camera is simply great, in my opinion, as are the dentist's chair and sink, too. The only problem (for me) is again the crampedness, which makes some accessories at the dentist's office almost impossible to use.
Stage 5 also begins with building two minifigures: a dancer and a music store assistant. The dancer is a woman, wearing her dark brown hair in a bun. She is dressed in a pink top which is decorated with darker pink butterflies, and a white tutu combined with what I presume are white tights. The music store assistant has receding reddish brown hair and he wears a red plaid shirt and dark gray pants. This stage contains the bricks to build two whole floors and the roof on top of the café. The lower floor contains a music store and the upper floor a dance studio. Building this stage is again very repetitive as the two floors are almost identical. I thought the piano in the dance studio is lovely, and the roof is very ornamental and pretty. I had some trouble aligning the newish semi-round 1x1 tiles (element ID 6151688) that line the tops of the walls, so I used a guide brick to make sure they were set in straight. What I found strange is that the designers used yellow inverted radar dishes for the cymbals of the drums, why not the golden ones that are in other sets? Also, there are no drumsticks for the drum set. The space behind the music store counter is again a very tight fit for the assistant minifigure, but the counter itself is nicely executed. Did I mention this stage is very repetitive?
There is one adult minifigure at stage 6: a female Lego fan (or AFOL) and a baby. The AFOL's medium nougat hair is in a ponytail, and she is wearing a light royal blue sweatshirt over a purple star-adorned shirt, and olive green trousers. The white-clad baby with fixed arms is a relatively rare figure, this being only the third appearance of this particular version of the baby. This stage builds the top floor and roof above the bakery and florist’s shop, plus (at last) the rest of the fountain. The result is an apartment full of Lego and a rooftop terrace with an outdoor kitchen which is equipped with a barbecue. I thought the two black Technic digger buckets used as a roof are just great, very nice parts usage. The AFOL's flat has an abundance of neat details such as all the Lego sets, red fold-out sofa bed, a kitchen, and a bathroom which is very small. The roof above the apartment is exceedingly pretty but also very fiddly and time-consuming to build. I'm not a huge fan of the rooftop kitchen and my opinion is that the space might have been better if used for some other purpose (perhaps a greenhouse conservatory). The yellow mugs and blue chairs are a tad gaudy for my tastes. The black stairs that run along the back wall are a bit weird because at one point the minifigures have to go inside in order to circle to another door which leads to another part of the stairs. The sides of the completed buildings are a little bit on the unattractive side, but the front and back are marvelous. I was astonished to find out there is no frog included!
Setting aside minor problems and issues of taste, Assembly Square is a great set, fantastic even, and a must-have for the people who like modular buildings. As it happens the Assembly Square turned out to be the perfect place to put my 60134 Fun in the Park minifigures in: there's even grass at the back for the lawn worker. And as for the drumsticks: my set had two extra gray 3-stud-long bars (element ID 6093527) included, so a minifigure can use those to make some sweet rhythms.
"
I would recommend this to a friend!
My Product Recommendations
Brick Bank
 (127)
(127)
Detective’s Office
(191)
Parisian Restaurant
 (262)
(262)
From:
Finland
Age:
35-44
years old
Customer Type:
LEGO Fan
Building Experience:
Intermediate LEGO builder
Play Experience (Optional):
5
/
5
Value for Money (Optional):
5
/
5
Level of Difficulty:
Very Challenging
Very Easy
Very Challenging
I would recommend this to a friend!
Share:
+7points
8of 9found this review helpful.
The Penguin™ Arctic Roller
The Penguin™ Arctic Roller
Posted:February 19, 2017
amazed78
Age:
35-44
years old
Customer Type:
LEGO Fan
Building Experience:
Intermediate LEGO builder
Overall:
5
/
5
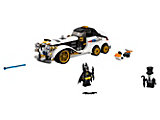
70911 The Penguin™ Arctic Roller
" The Penguin Arctic Roller Lego set consists of 305 pieces. These pieces can be used to build two minifigures and what I think is an early 20th century style black, white and gold automobile. Even before starting the build, one notices the big, glossy, smooth box in which the pieces are packaged. It certainly differs from the regular Lego City boxes that tend to be less shiny. Inside the box are two numbered bags, two separate, thin instruction booklets (one 48 pages, the other 60), and a sticker sheet with eight stickers.
The two minifigures in this set are Batman and The Penguin. This version of Batman is also in three other Lego Batman Movie sets (70903, 70905 and 70909). He has printing on both sides of his head and black torso and is also wearing a black stretchy cape and a black long-eared cowl. Batman's legs are unprinted. The yellow utility belt around his waist is a new piece. The Penguin appears also in set 70909, and the only difference between the minifigures is the light aqua head. In this set Penguin is scowling angrily. He is dressed in a black jacket over a gray striped vest, a black ascot tie with purple spots, and black gloves. There is no print on the back of the torso, and his short legs are plain black. However, in my opinion, the completely new parts (tall black top hat, white fur collar and closed black umbrella) more than make up for the lack of printing.
The build took a lot less time than I anticipated, and it is quite easy. The only hard parts of the build for me were attaching the golden horns (which represent the door handles) and the stickers. Luckily, none of the stickers are very large, so even that was a tolerable experience. Bag one contains Batman, and the car chassis. There are some technic bits and bobs involved but none of them are too scary, even for beginners. No stickers are applied at this stage at all (whew!), but I got a few chuckles when realizing that revolvers are used to represent (probably) an exhaust manifold. Inside bag two are the pieces for The Penguin and the rest of the car, including its wheels. In my opinion, The Penguin is a brilliant minifigure, I especially like his hat and umbrella. He fits inside the car even when holding his umbrella by its handle, if positioned carefully. If one happens to lose one of the transparent blue darts for the spring shooter, there is a spare one included.
There are a few rarish parts in this set: along with The Penguin's head, the black 4x4 plate with two horizontal clips (element ID 6174508) is currently unique to this set, while the pearl gold slope with lattice (6167584) makes an appearance in one other 2017 set (70906 The Joker Notorious Lowrider). Both the medium stone gray inverted cone with shaft (6167667) and the round printed dark stone gray 2x2 tile (6117346) are included in two other sets.
When I first saw pictures of Lego Batman Movie sets, this was the one that caught my attention and I knew I had to buy me one. I thought then and still think that the Arctic Roller gives out strong "The League of Extraordinary Gentlemen" and steampunk vibes. I simply love the looks of this car: it is a fantastic creation full of neat and whimsical little details and graceful curves. Using those white hot air balloon pieces as fenders was a stroke of genius! The only things I dislike about the car are the gaps both above and below of the trunk/boot lid and the "missing" front grille: the front does seem a bit empty without a proper radiator grille.
There are a couple of things in this set that caught my attention:
1) The instructions for the mini escape pod differ from the the pictures printed on back of the box.
2) Why the two separate booklets, when one would have been enough?
3) The licence plates should have been printed.
4) Only two minifigures. "
1) The instructions for the mini escape pod differ from the the pictures printed on back of the box.
2) Why the two separate booklets, when one would have been enough?
3) The licence plates should have been printed.
4) Only two minifigures. "
I would recommend this to a friend!
My Product Recommendations
Brick Bank
(127)
Parisian Restaurant
(262)
From:
Finland
Age:
35-44
years old
Customer Type:
LEGO Fan
Building Experience:
Intermediate LEGO builder
Play Experience (Optional):
5
/
5
Value for Money (Optional):
4
/
5
Level of Difficulty:
Easy
Very Easy
Very Challenging
I would recommend this to a friend!
Share:
+1point
1of 1found this review helpful.
Scarecrow™ Special Delivery
Scarecrow™ Special Delivery
Posted:February 18, 2017
amazed78
Age:
35-44
years old
Customer Type:
LEGO Fan
Building Experience:
Intermediate LEGO builder
Overall:
4
/
5
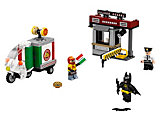
70910 Scarecrow™ Special Delivery
" The set Scarecrow Special Delivery is packaged in a very glossy and perhaps unnecessarily large box. The piece count for this smallish set is 204. Opening the shiny box reveals two numbered bags, a 64-page instruction booklet, and a sticker sheet for nine stickers, two of which are noticeably larger than the others. Bag one contains the pieces for Batman, Scarecrow and Scarecrow's red, white and green pizza delivery bike, while the contents of bag two can be used to build a Gotham Energy security guard and a predominantly gray and dark red guard booth.
All of the three minifigures are new, but only Scarecrow and the security guard are currently exclusive to this set, this version of Batman is at least in two other sets (70901 and 70904), two polybags (30522 and 5004930) and a foil pack. Batman is dressed in his traditional black attire with a cape and a cowl, but he also has a new yellow utility belt on. The belt is designed not to interfere with the movement of Batman's arms. His head and torso are printed on both sides but his legs are unprinted. Also Scarecrow has two expressions and prints on both sides of his mainly yellow torso with a printed red logo for "Luigi's pizza" in the front. In addition to this, he has printing on the front and sides of his sand blue legs and also dual molded yellow and brown arms including arm printing. Scarecrow's red motorcycle helmet has yellow flames printed on top, which means that (excluding the visor) all of Scarecrow's parts are new prints. Much to my surprise, the security guard is equipped with two heads, probably because his black hat with a gold badge would not cover an alternative face. His white torso has a black tie, a badge, two pockets and a black belt printed on it, while his legs are plain black. The torso is also used in another Lego Batman Movie set (70901).
The build is not exactly difficult, although there are a few technic parts involved with building the pop-out-sides of Scarecrow's delivery bike and the "Gotham Energy" sign on top of the guard booth. This time I really struggled with the stickers, especially those on Scarecrow's bike, but the long ones on the guard booth were almost equally difficult to line up with the tiles. Fortunately, the stickers are quite durable and withstood my bungled attempts to attach them with only minimal wrinkling of the corners. I also had some trouble with the arm that fastens the security camera to the booth: I couldn't make head nor tail of the picture in the instruction booklet and at first attached the arm the wrong way up. In my opinion, there is a surprisingly small amount of teeny tiny pieces in this set, the vast majority being slightly larger ones.
When playing with the set, I noticed the delivery bike is so top heavy that when separated from the cart it topples over very easily and fitting Scarecrow inside without banging his head on the cockpit is a delicate job. Driving through the boom barrier and wrecking it works well, as do the pop-out-walls function of the delivery bike. But if the plan was to get Batman on the bike after he has knocked out Scarecrow, think again: Batman is way too tall to fit under the cockpit. There are at least two new printed pieces that I know of in this set: the red, white and green pizza box (element ID 6175184) and Scarecrow's special scary pizza (6173696).
There are just three things that I did not like about this set:
1) No glass for any of the guard booth windows.
2) Bike cockpit a bit too small.
3) The boom gate should probably be built as a mirror image. Both the box art and the instructions show Scarecrow approaching the guard booth from its left side. What's the point of having warning colors on the boom if you're already inside the facility? "
I would recommend this to a friend!
My Product Recommendations
Firehouse Headquarters
 (144)
(144)
Ecto-1 & 2
(25)
From:
Finland
Age:
35-44
years old
Customer Type:
LEGO Fan
Building Experience:
Intermediate LEGO builder
Play Experience (Optional):
4
/
5
Value for Money (Optional):
3
/
5
Level of Difficulty:
Easy
Very Easy
Very Challenging
I would recommend this to a friend!
Share:
+5points
8of 11found this review helpful.
Posted:January 31, 2017
amazed78
Age:
35-44
years old
Customer Type:
LEGO Fan
Building Experience:
Intermediate LEGO builder
Overall:
5
/
5
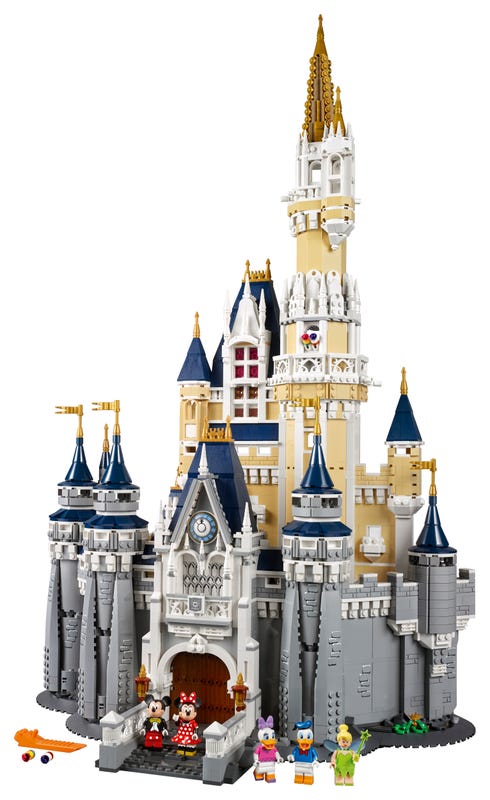
71040 The Disney Castle
" The Disney Castle is a huge set of 4080 pieces, and as the name so elegantly suggests, the pieces can be used to build a large, Disney-themed castle. Inside the enormous printed box are 18 numbered bags, one unnumbered bag with varicolored plates inside, a plastic-wrapped thick instruction manual along with a reflective sticker sheet of 17 stickers, and another rather large white box which, in turn, contains 15 numbered bags. Unlike with the set 75827 Firehouse Headquarters, the bags are distributed inside the boxes in a seemingly random fashion, so I had to open also the white box before starting my build. The build is divided into 14 stages, which just means that the bags are printed with numbers from '1' to '14'. Most of the stages include two bags of bricks, but some as many as four (such as stage 1) or as little as just one (such as stage 2). The manual is a 492-page tome and there are a total of 758 steps from start to finish.
I want to quickly describe how the build proceeds: The four bags numbered '1' build the very base of the castle, which is mainly dark gray when viewed from the front, and this stage also consumes most of the pieces from the only unnumbered bag. There are quite a few technic pieces in this stage, some repetition (although in mirror image fashion) and also upside-down building, which I do not like at all. Stage 2 builds two identical columns and two wall sections that are repeated again in the mirror image style. Stage 3 builds the brown front doors and their mainly white surroundings, front railing and some arches, and by stage 4, the build has advanced to adding the ground floor interior complete with knight statues, a vase, a clock, and a chandelier. The first stickers are applied at stage 5, which reveals the bricks for the mostly light gray outer left-hand side tower bases and wall, and I have to say that, at least in my manual, step 291 shows a wrong positioning for for the sticker, which will most likely result in some of it being covered by other pieces. I suggest being extra careful also with step 338 and its sticker. I decided to play it safe and ended up adding the stickers only after completing most of the stages 5 and 6. Stage 6 builds the outer right-hand side tower bases and wall which are again mainly gray. Bags with number '7' printed on them contain the pieces to finish off the outer wall and the earth blue roof over the front door. Stages 8 and 9 add to the height of the outer towers and give them earth blue roofs. Stage 10 uses up the last piece from the unnumbered bag and is also the stage where one begins to build the first detachable section of the castle (the prevailing color being brick yellow or tan with white trimmings) with a kitchen and a curtained room with a table and a glass case for a rose. Stage 11 adds two more rooms on top of the structure: a room with a spinning wheel, and one with mops and buckets and a trunk. Stage 12 builds a bedroom and some earth blue roofs for the towers in this section of the castle. Stage 13 starts the build of the tallest and detachable tower (also brick yellow) with a couple of small rooms in it, and the final stage 14 finishes the tower off with some more height and a gilded roof.
The five minifigures lurk in bags numbered 2 (Mickey), 5 (Minnie), 8 (Donald), 10 (Daisy), and 13 (Tinkerbell). Thus far, four of the five minifigures are exclusive to this set, the only exception being Donald Duck in his blue sailor's shirt and hat. Both Mickey and Minnie Mouse and Daisy Duck are also available through the Disney Collectible Minifigure Series, but it looks like they have been to the tailor shop for new outfits after the release of the series. Mickey is wearing a black tuxedo with detachable cloth coat-tails and red trousers with white buttons. Minnie is attired in a red dress with white polka dots and white ruffled pants and has a similarly polka dotted bow on her head while Daisy sports a dark pink short sleeved top with lavender ruffles, lavender shoes, and a lavender bow on her head. The only minifigure not available through any other set is the green-clad blue-winged fairy, Tinkerbell, who is wearing a lime green strapless top and a separate cloth leaf skirt. Her hairpiece is a very light shade of yellow and is completely new, and, unfortunately, her head is only one-sided. If the two gray and silver knight statues with blue plumes and gray spears are also counted as minifigures, their pieces can be found in the two bags marked with a '4'.
Much to my delight, the set has an abundance of either rare or rarish parts or new recolors of existing ones, and almost all of the printed pieces, such as the brown Unikitty tail (element ID 6158006), the round cookie tile (6161541) and the brown book cover (6157932), are new and so far exclusive to this set. Some of the earth blue pieces that are used in the tower roofs are also on the rarer side, such as the earth blue 2x2x2 cone (6144754), the 4x4x2 cone with an axle hole (6144755), the 6x6 radar dish (6116265) and the 75° angled 2x2x3 slope (6144751) all of which are currently available in this color only in this set. Similarly, other recolored pieces thus far available only in this set include the double concave 3x3 dark stone gray slope (6153582), the small titanium metal pot (6153593), the reddish brown crown with four spikes (6153584), the brick yellow mop (6153596) and the ornamental 1x4x2 white fence (6097236).
I thought the build was quite challenging, which mainly manifested in my adding wrong pieces to right places. An example of this are the brightly colored bricks behind the large clock in front of the castle: I built the structure completely wrong and had to think for a few moments before I realized my glaring error. There is a lot of repetition in this set, and tons of small fiddly bits which fall to the floor all the time and get sucked up by the vacuum cleaner or swallowed by a pet. All the above mentioned adds to the length of the build, which I guarantee will take hours and hours. However, the end result is a beautiful and an exquisitely detailed castle. I even noticed that there are not that many exposed studs marring the completed castle, as most of them seem to be covered by smooth tiles. There are also very clever references to various Disney movies, such as Fantasia, Brave and Aladdin, just to mention a few.
For easier transport, the finished castle can be divided into three sections (the gray bottom floor, the brick yellow second floor, and the tallest tower). Because the side towers and the walls connecting the towers are attached to the castle base from their underside only by large turntables (element ID 6045718), the walls and towers tend to feel a little wobbly when touched, so I suggest not using those parts of the for handholds when moving the set around.
Some of the insides are a bit cramped and some accessories are hard to use or at least hard to put back to where they belong, and some of the accessories are loose and might fall off the castle (such as the reddish brown bow for shooting arrows). Some of the rooms have unpleasant-looking exposed pins and also some strikingly colored bricks in the walls and when seen from the outside, the bedroom window is not very beautiful to look at. Some images of the instruction manual are a bit vague, or the angle shown is wrong and a top view of the build would made the build easier. However, in my opinion, these are minor flaws and all in all the castle still remains breathtakingly beautiful. Some of the building techniques are very interesting and new to me, and there are oodles of play features included. What more can one ask? A hinged back for the castle would have been a fantastic addition, but I believe this would have driven the price of the set through the roof. Perhaps 1-2 more minifigures and a few more printed tiles, but that is about it.
A highly recommended set for both Disney and castle fans and those who really enjoy complex and time-consuming builds!
"
I would recommend this to a friend!
My Product Recommendations
Firehouse Headquarters
(144)
Parisian Restaurant
(262)
From:
Finland
Age:
35-44
years old
Customer Type:
LEGO Fan
Building Experience:
Intermediate LEGO builder
Play Experience (Optional):
4
/
5
Value for Money (Optional):
5
/
5
Level of Difficulty:
Challenging
Very Easy
Very Challenging
I would recommend this to a friend!
Share:
+2points
2of 2found this review helpful.
Prison Island
Prison Island
Posted:December 1, 2016
amazed78
Age:
35-44
years old
Customer Type:
LEGO Fan
Building Experience:
Intermediate LEGO builder
Overall:
5
/
5
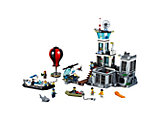
60130 Prison Island
" Prison Island is a large Lego City themed set of 754 pieces. Inside the box are eight numbered bags (one bag for each stage), one bag without a number with large pieces inside (for instance, a dark gray 16x16 plate and a dark gray rock piece), six instruction manuals and a sticker-sheet for 17 stickers, of which the last two are in the same protective plastic bag. The pieces can be used to build eight minifigures, two boats, a hot air balloon, a helicopter and an island-based prison compound complete with a prison yard, a watchtower and a helipad. I don't think Lego has manufactured a modern prison set before this, although there has been a few prisons in those retired medieval/fantasy Castle sets, one in Lord of the Rings, and one in Ninjago.
The bricks and pieces inside bag number 1 build a male police, a male crook, a gray shark, a large black and white police rubber boat and a small olive green rubber raft. Bag number 2 contains the pieces for a male police helicopter pilot, a female crook, a mainly red and black hot air balloon, and a mainly black and white police helicopter. Bags 3 to 8 have the pieces for the gray, white, black and brown prison compound and four additional minifigures: two male prisoners and a male and a female police officer.
The minifigures are quite basic: all four police officers are dressed in police uniforms, vests or jumpsuits of varying shades of blue and gray. The prisoners are wearing striped gray and white prison uniforms with an orange sleeveless undershirt and those criminals that aren't yet incarcerated are attired in casual but still striped mainly black and gray civilian clothes. There are no two-sided heads included in this, which in my opinion is a pity. All of the torsos are dual-sided, but only three of the minifigures have leg prints: the chopper pilot and the two stripey prisoners. Although I have categorized the minifigures as basic, in reality most of the torsos are new designs from 2016 and it looks like they will be re-used in 2017 sets as well. So far, both the light royal blue female police torso (element ID 6132846) and the light royal blue male police torso with a gray vest printed on it (6132869) appear only in two sets including this one (for both the other set is 60127 Prison Island Starter Set). Also the police chief torso (6132814) is new, it has been in four 2016 sets including this one. Both prisoner minifigures are made up from new parts (including the striped legs) and are currently available for purchase through two sets, the mustachioed prisoner wearing an orange tank top is in 60126 Tire Escape and the prisoner with angry eyebrows is also in 60128 Police Pursuit. The mustachioed prisoner head (6057836) is originally from one of The Lego Movie sets (70812 Creative Ambush) and this is only its third appearance.
There are some rarish pieces or recolors in this set: the black (element ID 6141950) and red (6141949) curved balloon pieces in those particular colors are currently available only in this set. The light gray brick 1x3x2 with inside bow (6129340), the black large rubber boat (6139318), and the titanium metallic lattice for frame 4x6 (92589) appear in three sets including this one. The dark gray mountain brick (6138752) is a new piece from 2016 and has, thus far, been in four sets. The olive green rubber boat (6016453) is an older piece, but in this color it has been included in four sets, just to mention a few.
I thought the build was surprisingly easy: there are a few technic pieces included, but they are not those horrible gears and axles and stoppers and spinning devices that require a lot of careful positioning and, incidentally, make my toes curl in fright. In my opinion, pasting on the stickers and attaching the pin-connected sections of the prison to each other were the most difficult parts of this build. The central structure of the exceedingly cool hot air balloon might also be slightly on the more difficult side for some builders and I had some trouble building the underside of the escape chute: I placed some of the bricks one stud away from the wall when they should have been flush with it.
In my opinion, Prison Island is truly a great and original set: finally there is a place where all those countless criminals can serve their sentences! The set has many fantastic play features (of which the chute is my favorite) and one of the breakable wall sections is such a secret that I could not find a picture of it at the back of the box. However, my absolute favorite part of this set is the hot air balloon, I simply love it! I thought it was nice to include a toilet inside the compound, and it seems to me that the coffee-maker is different (again) from all the previous ones that I have seen. There are also a couple of really humorous details: the black brick-built hand weight, the sticker picture of the female crook on the wall of the prison yard, and what I presume is a 'worker of the month' stickered picture inside the guard tower, although it is a bit hard to see. I think this set would look good when combined with Deep Sea sets (such as 60095) or 31051 Lighthouse Point. I actually tested it with 75903 Haunted Lighthouse and the colors match so well that they might have been a part of the same set!
I only have a couple of things I did not like about this set:
1) In my set, two of the barred doors are so loose that they will not stay shut. I tried switching them to another side of the door frame but that did not solve the problem.
2) Some parts of the prison are a little cramped.
3) No ladder to reach the top floors.
4) The stickered white sign should read 'prison' and not 'police'.
5) The handcuffs at the back of the chopper look a bit weird.
All in all, a great set for those who are looking for some variety and/or have an overflow of crooks in their Lego City!
"
I would recommend this to a friend!
My Product Recommendations
Heavy-Haul Train
 (15)
(15)
Vacation Getaways
(25)
From:
Finland
Age:
35-44
years old
Customer Type:
LEGO Fan
Building Experience:
Intermediate LEGO builder
Play Experience (Optional):
5
/
5
Value for Money (Optional):
4
/
5
Level of Difficulty:
Easy
Very Easy
Very Challenging
I would recommend this to a friend!
Share:
+28points
33of 38found this review helpful.
Anna & Kristoff's Sleigh Adventure
Anna & Kristoff's Sleigh Adventure
Posted:November 27, 2016
amazed78
Age:
35-44
years old
Customer Type:
LEGO Fan
Building Experience:
Intermediate LEGO builder
Overall:
4
/
5
41066 Anna & Kristoff's Sleigh Adventure
" 41066 Anna & Kristoff's Sleigh Adventure
Anna & Kristoff's Sleigh Adventure is a smallish set (174 pieces) based on the Disney animation movie 'Frozen'. If one follows the instructions, these pieces are used to build two minidolls (Anna and Kristoff), a reindeer named Sven, a sleigh, a shop, a barn facade and a hinged pair of hay chairs to sit on. When opening the box, out come two numbered bags, a reindeer in its own bag, a 76-page instruction booklet, a sticker-sheet for seven stickers, and a dark blue helicopter undercarriage. The contents of bag one are Anna, the bricks for a snow covered mainly brown shop, a snow covered brown and white barn facade and yellow hay chairs. Bag two contains Kristoff, his banjo, and a mainly blue and bright reddish violet sleigh. Anna's headgear, which has a rubbery feel to it, is in a separate bag and her stiff bright reddish violet cape is in a cardboard box. Sven the reindeer's antlers are flexible, rubbery even, which is undoubtedly a safety feature .
Sven the reindeer and Kristoff are currently exclusive to this set, while this version of Anna appears also in 41062 Elsa's Sparkling Ice Castle. Both the bright reddish violet horse hitching (element ID 6135358) and dark blue helicopter skis (6137496) are, to date, available only in this set. Other somewhat rarish pieces are those in medium blue, especially the 1x3 brick (6000881), the orange carrot piece (6100397), the medium azure skis (6088558), the 4x6 bright yellowish green plate (6060848), the reddish brown ninja horns (6116638) and the reddish brown door (6126109) which has thus far appeared in only two sets besides this one.
The build is quite easy, I thought applying the stickers and putting the cape on Anna were the most difficult parts of the build. There are no technic parts to worry about, and while it is possible to place the yellow hinge piece (connecting those two hay chairs) on the brick yellow plates the wrong way round, the next step of the build will reveal the mistake. For me, personally, the highlight of this set is Sven, and the carrots he eats are a simple yet fantastic creation! The trading post with its abundance of details and the sleigh are very nice looking.
However, building this set did raise some questions and odd thoughts:
1) Why doesn't the reindeer have a gray brick (element ID 4211093) for the hole on his back like the horses in Friends sets do?
2) Why is there no clerk for the shop?
3) Sven is way too large, almost exactly the size of a Lego horse. In reality, reindeer are much smaller.
4) I had no idea what the two smaller builds (barn fascia and hay chairs) in bag 1 were supposed to be until I read the description from Lego Shop page (and I had to use a thesaurus to find out what fascia even means). In my opinion, the bricks should have been used to make the trading post bigger.
5) All three structures are separated, which makes it easier to lose / misplace the parts.
6) The sleigh is a bit bulky and wide, yet I had some difficulties fitting both minidolls on it.
7) A clip for Kristoff's banjo would've been great. "
I would recommend this to a friend!
From:
Finland
Age:
35-44
years old
Customer Type:
LEGO Fan
Building Experience:
Intermediate LEGO builder
Play Experience (Optional):
4
/
5
Value for Money (Optional):
3
/
5
Level of Difficulty:
Easy
Very Easy
Very Challenging
I would recommend this to a friend!
Share:
+11points
13of 15found this review helpful.

Haunted Lighthouse
Haunted Lighthouse
Posted:November 22, 2016
amazed78
Age:
35-44
years old
Customer Type:
LEGO Fan
Building Experience:
Intermediate LEGO builder
Overall:
5
/
5
75903 Haunted Lighthouse
" Haunted Lighthouse is the second largest Scooby-Doo themed set with its 437 pieces. Those pieces can be used to build four minifigures, a Great Dane called Scooby-Doo, a speedboat and a two-room lighthouse standing on a rocky island with two caves underneath. The box contents are as follows: five bags numbered from 1 to 5, two instruction booklets, one sticker-sheet with 14 stickers on it, a blue 8x16 plate, and a black straw. Booklet number 1 is a 60-page tome, while booklet number 2 has a few more pages (68 to be exact).
The four minifigures of this set are Daphne Blake, Norville "Shaggy" Rogers, Lighthouse Keeper/Verona Dempsey and Swamp Monster/Mr Brown. I was glad to notice that all minifigures have two-sided head and torso prints, but all their legs go unprinted. Both the Lighthouse Keeper, attired mainly in a dark blue outfit, and the dark green and purple Swamp Monster are, so far, exclusive to this set, as is Shaggy's seaweed spattered torso. However, Daphne (dressed in dark purple with a green scarf around her neck) appears also in 75904 Mystery Mansion. Lighthouse Keeper's gray hair-beard combo is a recolor, and has previously been used in two 'The Hobbit' themed sets. Swamp Monster's headgear is a recolor from a Monster Fighters set dating back to 2012. Scooby-Doo is in a sitting position: his body is included in three sets including this one and his head in two, the other being 75902 The Mystery Machine.
Bag number 1 contains Scooby-Doo, Shaggy, a cool hamburger, a pair of water-skis, and a speedboat which has the same color scheme (bright yellowish green and medium azure) as The Mystery Machine. Scooby-Doo is in a small soft plastic baggie of his own. The hamburger is an inverted build, the printed top piece is actually one of those slide shoes that normally go underneath a structure to reinforce it. Five of the 14 stickers go on the very cleverly designed speedboat and I especially like the spinning propeller and the metal tinted engine. There are no minifigures in bag 2, just approximately half of the lighthouse base, a sea beacon, a treasure chest, and a nice new printed 2x2 tile. Bag 3 reveals the pieces for the Swamp Monster (with a gold trident), and the rest of the lighthouse base. I couldn't help but notice that my set came with an extra trident. In my opinion, the Swamp Monster is a great minifigure, although the human side of his head is a little awkward and doesn't look very good under his headpiece. Bag 4 has again no minifigures in it, but there are the parts for a tilting skull-shaped hatch / cave door, a crate with diving equipment, the lighthouse kitchen, a 'keep out' sign and brown stairs. The eyebrows of the skull can be slanted to create different expressions. Bag 5 contains the pieces for Daphne, the Lighthouse Keeper (with a glow-in-the-dark head), top part of the lighthouse, an oar, a spider and its web, a bone, and a golden key. My set included also an extra oar.
I made just two small mistakes during the build, so, in my opinion, it is on the easy side. I think the most difficult part was probably stickering those transparent window pieces that go on top of the lighthouse. This set was a surprisingly quick build, I think probably because there is a very limited number of the tiny 1x1 pieces included and most bricks are larger than that. Haunted Lighthouse is a very cool build, but I have to say it would have been even cooler if the lighthouse had a (hinged) back instead of being open. My favorite minifigure is probably the Lighthouse Keeper, the Swamp Monster being a close second. My favorite play feature is the skull-shaped cave door, but I also like the top of the lighthouse with its brilliant handrail and the tilting mechanism which reveals a hidey-hole. A light brick might have made the set even better, but I'm quite happy without one.
There are a few rare pieces also in this set: the dark red curved 2x2 brick (element ID 4625551) is currently available in only two sets including this one, as is the dark red 2x2x2 roof tile (4625281), and the bright yellowish green 4x6 inverted boat bottom part (6116511). The bright yellowish green 6x10x2 inverted boat bow (6116504), the bright yellowish green 4x6 plate with two slices cut off (6116514), and the 2x2 tile with a map and 'X marks the spot' printed on it (6123042) are, to date, included only in this set. The hamburger top piece (6122533) appears in four sets, all of which are Scooby-Doo themed.
I actually have only three things I didn't like about this set:
1) No back for the lighthouse.
2) The villains' headgear are so tight that their heads tend to get stuck inside.
3) No cheese and rat elements as promised in the product description. A glow-in-the-dark rat nibbling on a piece of cheese would have been a great addition! "
1) No back for the lighthouse.
2) The villains' headgear are so tight that their heads tend to get stuck inside.
3) No cheese and rat elements as promised in the product description. A glow-in-the-dark rat nibbling on a piece of cheese would have been a great addition! "
I would recommend this to a friend!
My Product Recommendations
Ecto-1 & 2
(25)
Ghostbusters™ Ecto-1
(145)
From:
Finland
Age:
35-44
years old
Customer Type:
LEGO Fan
Building Experience:
Intermediate LEGO builder
Play Experience (Optional):
5
/
5
Level of Difficulty:
Easy
Very Easy
Very Challenging
I would recommend this to a friend!
Share:
+2points
2of 2found this review helpful.